Sauerkraut!
If you grew up eating this sour-salty, fermenty, stinky-yummy food, then you had the opportunity to get to know and love it. If you grew up with people who made their own, then I'll bet you jump at the chance to eat fresh, homemade kraut. Not the canned grayish junk from the grocery store. I mean the crisp, golden-colored marvel with a flavor as complex and briny as that of any oyster. Fall time is sauerkraut time. To me, nothing says "ready for winter" like a crock of cabbage fermenting in my basement.
Sauerkraut, like other fermented and/or probiotic foods, may seem intimidating to make at home. Don't you need a bunch of fancy equipment? Don't you need cultures and starters? Don't you need a climate-controlled laboratory in a titanium chamber buried deep in the bedrock miles below your house?
As it turns out, no. Shredders and large crocks make the job go faster if you are preparing lots of kraut. But unless you need to feed a crew of Slavic laborers, then everyday kitchen gear will do. Read on!

Speaking of Slavic laborers: My maternal grandfather's family came to Minnesota from Croatia about a hundred years ago. They brought with them the tradition of making and eating this economical and easy-to-store food. In a climate where fresh food is scarce for fully half the year, the Vitamin C and fiber in sauerkraut quite literally kept Grandpa's family alive and healthy through the winter.
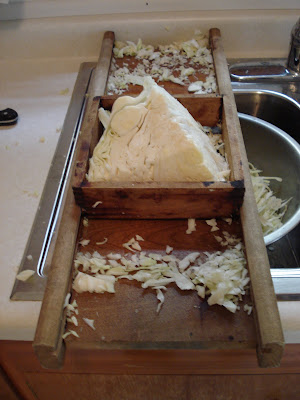
In the early 1940s, when Grandpa married and set up housekeeping with my grandmother, they bought some Red Wing stoneware crocks in 1, 3, 5, and 10 gallon sizes; oak boards that my grandfather cut to fit inside and press down the cabbage as it works; and a kraut board. A few years ago, my grandmother passed this equipment to me. It is a sacred trust to be the guardian of these artifacts. It is a duty and a privilege to be entrusted to supply the sauerkraut needs of my extended family.
Every fall I buy the freshest cabbage I can get. I weigh it, shred it on the kraut board, salt it, and pack it tightly into the crocks. Within an hour, the cabbage has released enough juice to cover itself with a few inches of brine. It's time to move the crocks to a cool, dark place for the next few weeks. I put the presser boards on top of the cabbage, weigh them down with quart jars full of water, cover the arrangement with a clean cloth, and wait.

The top of the brine needs skimming every couple of days. Pressing lightly on the boards will release a few bubbles of the carbon dioxide produced in fermentation. Other than these few tasks, the kraut demands nothing of me.
The kraut might be done in two weeks, or it might be done in six. It all depends on how cold it is in the basement. Colder temperatures mean longer fermenting times but also more flavorful kraut. I know I can rely on the sauerkraut to tell me when it's done: it will stop bubbling a few days before fermentation is complete. Then I'll have a look and a taste. The cabbage will have transformed from opaque white to a translucent straw color. Its characteristic flavor is the final test. The finished kraut can stay in its crock in a refrigerator-cold place, or it can be home-canned.
If you don't have a collection of seventy-year-old stoneware crocks, it's not a drama. You can use any glass, ceramic, or food-grade plastic container. A five-quart ice cream pail will work. Perhaps the best and easiest thing of all is a gallon-size Ziploc bag. You can seal all but a corner, press out all the air, and seal completely. Repeat this once a day and there will be no need to worry about skimming anything off. You won't be able to smell the fermentation, either—an advantage in an apartment or small home.
Sauerkraut
Buy the best cabbage you can find. The head should be dense and heavy, the leaves wrapped tightly. When you try to peel back a leaf, the rib should snap rather than bend. If the stem is still bleeding where the farmer cut off the cabbage's head, then you have picked a winner.
For each gallon of container capacity:
5 pounds of trimmed and cored cabbage
3 tablespoons of salt
Optional: 2 teaspoons of caraway seed or 3 tablespoons of juniper berries
- Work with five pounds of cabbage at a time. It is easiest to trim and core the head, then weigh the pieces before shredding.
- Shred the cabbage. Do this by hand rather than in a food processor, which will mush up the cabbage too much. A kraut board or other shredding device makes the work go by quickly. For just five pounds, though, a knife is not bad.
- Using your hands, mix the cabbage well with the salt and optional seasoning.
- Pack the cabbage into the container. Smack it in there tightly. Don't leave any air space in between pieces.
If you are making more than 5 pounds in a large crock, repeat steps 1-4 until the crock is full (leave room for brine).
Cover the top of the cabbage with a plate, board, cloth, or some whole cabbage leaves. Weigh it down with a well-scrubbed rock or some quart jars filled with water. If you are using a gallon bag, squeeze out all the air and seal. Cover with a clean cloth.
Check daily to every other day, skim off any scum, and press out any new bubbles.
When fermentation is done, it's sauerkraut! Call me up. I'll be over for dinner.

