Sunday, December 20, 2009

Ravioli pa' Natale


According to Mom, her nonna—my great-grandmother—spent hours and hours making ravioli for Christmas each year. They truly are a labor of love: between preparing the filling, making the pasta, rolling and assembling the ravioli, and making their sauce, it's like you've made the meal four or five times. When the food passes so many times through the hands of the cook, it cannot help but absorb what's in the heart of the cook.

And in my heart, there's joy to see the ravioli spring into the world out of nothing but flour, egg, pumpkin, and cheese. There's the warm companionship of cooking with my partner, Beth. There's a sense of connection with the women in my family, whose hands have also kneaded dough, rolled it thin, doled out filling, and set trim little pasta shapes on a floured towel to dry. And there's the anticipation of delight when, on Christmas Day, people we love will take pleasure and nourishment from the food we're making.

Ravioli di Zucca pa' Natale
That is to say, pumpkin ravioli for Christmas. This is my recipe, not Nonna's, but I hope she'd be proud. You can make the filling ahead of time and freeze it. You can also freeze the ravioli.

This recipe will make perhaps 80 or so ravioli. For a side dish, plan on 6 per person. For a main dish, plan on 9 to 12 per person.

The filling:
A pumpkin, 3-4 lb.
½ lb. grated Parmesan
Salt and black pepper to taste

The pasta:
5 c semolina flour (any other kind will work)
5 eggs
A tablespoon or two of olive oil

The sauce:
For every 6 ravioli you plan to serve,

1 T butter
2-3 sage leaves, fresh or dried
1-2 baby spinach leaves
1 T shaved Parmesan cheese
Ground black pepper


Cut the top off the pumpkin. Hollow it out, then replace its lid. Place in a pan and bake at 375° for one to one and a half hours or until tender. Let cool.

Peel the pumpkin, cut the flesh into small pieces, and mash it. Mix it with the Parmesan and seasonings to taste.


On a wooden cutting board or directly on your work surface, make a mountain of the flour. Make a volcano crater in it with your fist. Crack the eggs into the crater and add a splash of olive oil.


Use a fork to whisk the eggs in the volcano crater. Whisk all around the edges of the crater. Flour from the volcano mountain is incorporated into the eggs as you go, and soon you are whisking a pale yellow batter. Go slowly so that the eggs whisk evenly and you avoid lumps.
Soon, the batter has become a soft dough. It will grab your fork and you won't be able to whisk anymore.

Abandon the fork, toss a handful of flour on top of your dough, and start kneading in more flour. Gather, squeeze, and turn until the dough is like Play-Doh and does not feel tacky any more. There will still be flour left on your work surface; don't worry about that.
You must be tired by now. Your dough sure is, so wrap it up in foil, plastic wrap, or a barely damp cloth and let it rest 20 minutes. This will allow it to become stretchy.


Now it's time to roll. Get ready a barely damp cloth. Roll your dough out paper thin. You can do this by hand if you are very stubborn. I have an Atlas pasta machine, which is much easier.
Rolled-out pasta is susceptible to drying, so keep it fresh by covering it with the barely-damp cloth while you roll more sheets.


We rolled out to setting 6. We made rectangular sheets by cutting lengths, brushing the edges with water, and rolling the pieces together with the pin.
Work quickly to avoid drying but carefully to avoid tearing.


While I was fussing with the pasta sheets, Beth made tidy little balls of filling. We placed them on a sheet several inches apart, keeping in mind that we would need a seam allowance between each dumpling.
Use a damp pastry brush to moisten (barely!) the space in between each filling ball.


Cover with the other pasta sheet. Allow the pasta to drape over the filling. Seal the fillings in between the pasta sheets by pressing with your fingers. Avoid air pockets; you can get rid of trapped air by making a tiny slit with a paring knife, pressing out the air, then pressing the slit closed.
If you tear the pasta sheet, you can patch it with a dampened scrap of pasta. It doesn't look like America's Top Chef made it, but it tastes the same. And none of those people are invited over, anyway.


Dust a dish towel with flour. Cut between the ravioli with a knife or pizza cutter. Use a bench knife or spatula to pick them up and transfer them to the towel. Let them rest until they are dry enough to handle.
You can pack them up in the freezer at this point. But before you do, make sure to boil some water and test them out. You know, to make sure they're delicious enough to serve.


Set a pot of salted water on the stove to boil. Heat the butter in a skillet or saucepan. Gently sauté the sage leaves until they are crispy; break them up in the butter a little. Sliver the spinach leaves.

Cook the ravioli. If they are fresh, this will take less than five minutes. If they are frozen, just drop them right in the boiling water without thawing.

Drain them well and arrange them on a plate. Drizzle them with the sage butter, sprinkle with shaved parmesan, and toss on a smattering of the spinach slivers. Finish with a grind or three of fresh black pepper.

Buon Natale, mios amicos.

Saturday, December 12, 2009

Bûche de Noël Challenge

(artist's concept)


When friend Katrina mentioned that she wanted to attempt a bûche de Noël, I can't remember who first suggested making the traditional French Christmas dessert together. But I do know it was me who proposed "Bûche de Noël Smackdown."

Katrina laughed nervously at that idea. She is the embodiment of kindness and gentility, and I don't think she has a competitive bone in her body. I, on the other hand, freely trade good-natured insults with friends and often cross the line in my efforts to top their putdowns. Katrina is the one person for whom I try my hardest to be kind. If I ever hurt her feelings, even in a friendly cake contest, I could never forgive myself.

"If I set my dial at Lovefest and you set yours at Smackdown, we'll meet in the middle," I said. And so we agreed to a Friday night baking party.

A classic bûche de Noël is made with a chocolate génoise sheet cake and buttercream frosting. After investigating simpler cake and frosting schemes and assessing their levels of difficulty, we opted to take on the challenge of the traditional recipes. We decided, while we were at it, to make two—one for each of us. "How long do you think this will take?" asked Katrina. "Hmmm... three hours," I replied.

Boy, was I wrong. Katrina, her friend and my partner Beth, and I worked together for five hours on the two bûches. Katrina's poor little hand mixer labored away on high speed for at least two solid hours. We were amazed at how many eggs and how much butter disappeared into the cake batter and frosting. And by the end, I was making only indirect requests; and Katrina was threatening, as a joke, to throw me out of her kitchen.

Bûche de Noël: the great leveler, the great reverser of roles.

The cake:
The génoise cake batter requires that eggs be whipped with sugar until they triple in volume. We doubled the recipe, so there were eight total. Here are four eggs at the start.


Beth whipped the eight eggs for nearly an hour to get them ready. We were afraid to imagine how strenuous it would be to whip them by hand. Clearly French cooking is based on a feudal business model, as it depends on a lot of strong young kitchen workers.


Beth adds equal parts cake flour and cocoa. We spread this into two sheet pans and baked them.


Meanwhile, the frosting:
To make buttercream, first cook two cups of sugar and a cup of water to the soft ball stage. Then pour it in a thin stream into beaten, pasteurized eggs. Since the mixer was in use, I opted to beat by hand. This was fun at first. By the time I finished, though, it was a matter of pride.


Then Katrina beat an appalling amount of butter into the frosting. I am ashamed to tell you how much. Oh, OK, six sticks.


This is what a pound of chocolate looks like when melted with a half cup of water.


And here it goes into the buttercream. You must talk like Julia Child when performing this operation.


By the time this buttercream was ready, the cakes were baked, cooled, and brushed with a quarter cup apiece of equal parts brandy and simple syrup.


Assembling the bûche:


Frost the cake generously.


This was the scary part. We were four and a half hours into this job. The last step was to roll up the cake. And if we screwed this up, all our work would come to naught. Those are Katrina's hands rolling the cake. My hands, at the right, are "helping" because I'm terrified.


My fear was groundless. Katrina rolled it up like a pro.


We wrapped up our cakes tightly, packed up buttercream to spread on the outside, and popped them into the freezer. In a couple of weeks, we'll take them out, frost them to resemble logs, and serve them at Christmastime.


By then, each cake will have taken about 8 or 9 person-hours of work. The moral of the story is this: if you see a bûche de Noël in a bakery for any amount of money, pay it. It's worth it.


Bon appétit!


Post-Christmas Update: Here it is in all its splendor.

Monday, December 7, 2009

Peace, Love, and Gingerbread


True confession: I don’t like Christmas much. I don’t like the music. I don’t like the decorations, or Salvation Army bell ringing, or cards. I don’t like shopping. I don’t like how the presumption of Christianity blots out other perspectives at this time of year. I don’t like how it all happens against a deepening backdrop of cold weather and dark skies; or how in January, all the lights will fade and I will feel abandoned to a bleak winter without even the respite of Christmas’s unwelcome distractions.

One thing that keeps me peaceful at Christmastime is gingerbread. I love the alchemic ritual of boiling molasses, sugar, and fat. I love perfuming the flour with splashes of dark, sweet cinnamon and sharp, warm ginger. I love the surface of the rolled-out dough, smooth and cold like black marble. I love my cookie cutters—those old friends I see just once a year. Tin ones from Mom that we used when I was little. Plastic ones that I bought for myself as a young adult, an act of self-assertion for my first holiday on my own.

In those days, I was slowly realizing that I can define this season however I want. I don’t have to be in the office gift exchange. I don’t have to decorate a tree or send cards. I don’t have to let someone else tell me how and when to give. And I can leave all these things behind without losing what’s important: warmth. Light. Faith that, even in the looming darkness of winter, there are human connections to be made. There are cookies to be baked.

I love to decorate each cookie shape in a particular way. The stars and bells get red sugar sprinkles. The trees and holly leaves get green. The dreidls and stars of David get blue sprinkles. The blue cookies are for friends whose philosophies get crowded out this time of year. I want to say to them, “True, this cookie exists because of Christmas. But I know you don’t ride that train, and I see you.” And really, when I bake gingerbread, that’s what I’m saying to, and for, myself.

Gingerbread Molasses Cutouts
Makes 7 or 8 dozen cookies, each 2 or 3 inches across. The great thing about this recipe is how many times you can roll and re-roll it. You can keep cutting out cookies until the dough ball is too small to make a single ‘nother one.

1 c shortening
1 c molasses
1 c sugar
1 c vinegar
2 eggs
6 c flour
½ t baking powder
½ t salt
1 t baking soda
1 T ginger
1 t cinnamon

Combine shortening, molasses, sugar, and vinegar in a large saucepan. Heat, stirring constantly, and bring to a rolling boil. Cook 2 minutes. Remove from heat and cool. Add the two beaten eggs.

Sift, mix, or whisk all the dry ingredients together. Combine the wet and dry ingredients and mix well. Roll the dough into a ball and chill it well. Overnight will do it.

On a floured board, bench, or countertop, roll the dough ⅛ to ¼ inch thick. Cut out shapes. Decorate them with colored sugar, currants, and small candies as desired. Bake on greased or nonstick cookie sheets 6 to 9 minutes at 375°.

Use your cookies to celebrate—or not—however you want. But I do hope they'll make you happy this season.

Sunday, November 29, 2009

Post-Thanksgiving soup blues


Yeah, yeah. Here's the bowl of soup I made out of the Thanksgiving turkey. Whatevs. Who cares about stupid turkey soup. I miss my brother.

Don't worry; he's alive and well and has a beautiful family, so I'm thankful for that. I know I shouldn't bitch. Our country is at war. Some people have to miss their brothers every Thanksgiving for the rest of forever. My brother's not in the next world. He's just in the next time zone.

So I didn't get to see Brian this year, but it was still a nice holiday. I like the big dinner with family, and I like working with my mom to clean up the kitchen. It's just that I realized something this year. My very favorite Thanksgiving tradition is eating the leftovers with Brian.

I really missed wandering into Mom's kitchen at 10 or 11 at night, after my parents have gone to bed. There's a loaf of white bread on the counter. There's the big white Tupperware bowl in which we've stored leftover turkey since I was a little girl. There's Brian getting out a plate for his sandwich. He always makes me one too: dark meat, too much mayonnaise, and a lot of dill pickles. We stand in the dark kitchen biting the sandwiches and then the pickles. I guess I could have made my own sandwich, but it doesn't taste the same.

This year Mom sent all the leftover stuffing home with me. I love stuffing. It's my favorite dish on the entire Thanksgiving menu. But I accepted it wistfully, because that stuffing should not have survived the night. I should have spent all of Thanksgiving afternoon and evening keeping track of where Brian was. It takes vigilance to notice when he has materialized at the fridge to abscond with the stuffing. If I don't show up in time to demand my share, he might eat the whole bowl.

So, Thanksgiving is over, the stuffing is mine, and I already had a turkey sandwich. I made soup, but I still feel all lonesome for my brother. Wish I knew the recipe to shake it.

Sunday, November 22, 2009

Thank You for Not Liking Delicata Squash


I got home today to find a squash stuffed in my mailbox.

Some people might be puzzled by this, but I knew exactly what it meant. It meant my neighbors with the Harmony Valley CSA do not care to eat this squash.

"Seriously?!" I asked the mailbox. Mailbox didn't answer. I looked up and down the street. No one. I snatched the squash and hurried inside.

Quickly, now, before they change their minds.

Caramelized Delicata
1 delicata or other thin-skinned winter squash
2 T butter
Salt and pepper
2 T Madeira

Slice the squash into rings. Pare the squash innards out of the middle of each ring.

Heat the butter over medium heat until the foam recedes. Turn the heat down a bit and lay the squash rings in the pan. Cook gently for about five minutes. They should be turning a caramelized brown on the outside.

Turn the rings over. Cook another five minutes.

Sprinkle on salt and pepper to taste. Shake the pan around a little. Remove the squash rings and deglaze the pan with the Madeira. Pour the sauce over the squash.

Thank you, neighbors. You can kick your undesired squash over here anytime.

Sunday, November 15, 2009

Big Goddamn Steak Night!

My favorite holiday of the year is one I made up: Big Goddamn Steak and Bucketful of Whiskey Night—or just Big Goddamn Steak Night for short. It's an annual dinner party of food movie proportions: my own little Big Night.

Originally a thirtieth birthday party for my best friend, this decade-long tradition has become a night of big songs, big toasts, big personalities, and big steaks. Not all the steaks are made of beef; vegetarians and carnivores alike sit down at the big table. Not everyone drinks the whiskey sours that flow like tap water from the big pitcher. Literal adherence to the theme is not as important as the spirit of friendship, epicureanism, and ribald snarkiness. That's the true meaning of Big Goddamn Steak Night.

BGDSN is BYOM—bring your own meat. As guests arrive, they pile their steaks on the kitchen counter. When everyone is present, I grill the steaks to order. People who request their steaks cooked more than medium are teased.

If there's anything more fun than the meal that follows, I don't know what it is. The traditional side dishes are passed around and devoured. We sporadically interrupt our conversation to sing something from the Big Goddamn Steak Night songbook, which tends to grow ever year as new songs are invented or introduced from elsewhere.

Dessert is the time to begin calling friends and family in different time zones. Often these individuals are eating big steaks, too. We sing songs and exchange congratulations. (My parents get a call earlier in the day warning them to turn off their phone before going to bed.)

After dinner, we usually compose haikus or listen to a dramatic reading. That sounds so literary, doesn't it? Except the haikus are all about steak and whiskey, and the readings are from young adult novels of questionable moral value. Or maybe we dance to the cheesy funk music playing on the stereo.

When the last guest has departed and all is quiet except the ringing in my ears, I look at my debauched table and smile. I am so thankful for my friends and for the fun we've had. I am the luckiest big goddamn steak in the world.

Big Goddamn Menu
I invite you to hold your own BGDSN whenever you're up for a big party. Mine is the Saturday closest to November 15.
Bucket of Whiskey Sours
Bring Your Own Meat
Big Goddamn Salad
Five (expletive deleted) Pounds of Mashed Potatoes
A Tiramisú as Big as You


The whiskey sours are made with Canadian whiskey and Sunkist Sparkling Lemonade in a 1:1 ratio. I know. We don't pull any punches on BGDSN.

The salad is always romaine lettuce with balsamic vinaigrette. This year it included sunflower seeds and some red pear slices that had been macerated briefly in lemon juice.

Yes, the potatoes have a crass title that I will not repeat here. They are Yukon Golds scrubbed well, sliced up with their skins on, and boiled. Then I mash them with butter, sour cream, sea salt, freshly ground black pepper, olive oil, and two heads of roasted garlic. Mmm-hmm. We save the goofing around for the dinner table.

I make the tiramisú with chocolate cake instead of the conventional ladyfingers. It's so good, makes you want to call your mom. Unless she's sitting right next to you, as mine is some years. Then it makes us both want to call Grandma.

Mangiamo!

Sunday, November 8, 2009

Persimmon Teacake


Yesterday I was in my house thinking about cake when I heard a knock on my door. Two neighbors, Gwen and Victoria, had a fruit identification question. In her Harmony Valley fruit share, Gwen had found mysterious pinkish eggs filled with fragrant orange goo. I recognized them as passion fruit.

"Of course the neigborhood foodie would know," Gwen said. And then she persuaded me to take four persimmons, also part of the fruit share. "Blog about these!" she challenged.

The only way I know to eat persimmons is with a spoon. Grandma Rombauer notes in Joy of Cooking that they are good in cake, but she does not go so far as to include a persimmon cake recipe. Hmmph. Thanks for nothing, Granny.

Hey, I don't need her. I can make up my own persimmon cake. I think.

I know from years-ago forays into vegetarian cooking that you can substitute fruit pulp for an egg in almost any cake recipe. So I went digging through different cookbooks looking at applesauce and banana cakes. After reading a few nearly identical entries, I felt about as brave as I was going to get.

I blended up the persimmons in the food processor, and they turned into a fetching orange colloid exactly the consistency of beaten eggs.

"Hey, this is fun!" I exclaimed. Feeling quite the adventurer, I mixed up my recipe. All the applesauce cakes I researched called for a half teaspoon each of cinnamon, nutmeg, allspice, clove, and mace. I ignored the spices. I wanted to recognize the persimmon taste.


I ended up with a pretty yellow-orange batter flecked with bits of darker orange persimmon skin.


My cake turned out dense and moist. It's like a fine-textured banana bread. That lovely batter turned into a brown cake, but the soft bits of skin held their color and studded my cake like little tangerine-colored jewels.


I cut slices and dusted them with powdered sugar and the tiniest bit of cinnamon. I delivered them to the houses next door. A few minutes later, the young neighbor daughter brought back the finest praise a cook can receive: my empty plate.

I declare a success!

Persimmon Teacake

1½ c flour
¾ t baking soda
½ t salt
1 stick butter
¾ c plus 2 T sugar
1 egg
1 c puréed persimmon (about 2 to 2½ persimmons)

Preaheat your oven to 350°.

Whisk together the flour, soda, and salt. Set aside.

Cream the butter and sugar together until light and fluffy. Beat in the egg. Add the flour mix in three portions, alternating with the persimmon and mixing until just incorporated. Scrape down the bowl as necessary.

Spread the batter in a greased and floured loaf pan and bake for 45 to 50 minutes, or until a toothpick stuck in the center of the cake comes out clean. Cool in the pan on a rack for 10 minutes, remove from the pan, and cool completely.

Cut slices of cake and lay them on serving plates. Put a tablespoon of powdered sugar and a half teaspoon of cinnamon side by side in a sieve. Tap the sieve gently over the cake slices so they get dusted with the two distinct colors.

Mangiamo!

Friday, October 30, 2009

Mindful Pumpkin Soup


My significant other, Beth Berila, is a feminist scholar and a yogini. Her work is about the commonalities between feminism and yoga, and meditation is one of her tools. Beth studies the mind/body connection and its power to help people—especially young women—live intentional, self-directed lives.

She also loves pumpkin soup. (You were scared I wasn't going to talk about food, weren't you?)

So, to honor Beth's work, her importance in my life, and the deliciousness of pumpkin, here's a cooking meditation to feed body and spirit.

Mindful Pumpkin Soup
This makes a ton of soup. Freeze some, or use a smaller pumpkin and cut the rest of the ingredients in half. The meditation is Daoist, not Buddhist, but I believe it will do the trick.

1 pumpkin, about jack-o'-lantern sized
1 quart mushroom broth
3 cloves garlic
2 4" sprigs of rosemary
5 or 6 leaves of sage
A pinch of summer savory
5-10 black peppercorns
2 T olive oil
2 T balsamic vinegar
2 T soy sauce
1 c red wine
1 cayenne pepper
1½ cups orange juice
1 pint cream, milk, or soy milk
Salt to taste

1. Cut up the pumpkin, remove seeds and string, and roast the pieces in a 400° oven until a fork easily pierces the center of each piece (about 40-60 minutes). Reflect on how your jack-o'-lantern's cycle is not exhausted, but is renewed as soup.
2. Peel the pumpkin and place in a heavy stockpot. Add all the rest of the ingredients except the juice and milk. Simmer until the garlic is soft and easy to mash with a spoon, about 20-30 minutes. Meanwhile, contemplate the changing seasons: Your pumpkin sprouted in the spring, grew all summer, brought you happiness in the autumn, and now will feed you in winter.
3. When the simmering is done, purée the soup in a blender. You will need to do several batches. Return the purée to the pot over low heat. Stir in the orange juice. As you do, think about how the citrus lightens and brightens the deep, rich winter flavors of the roasted pumpkin. The soup holds lightness and brightness, depth and richness in a dynamic balance of deliciousness.
4. Add the milk and salt to taste. Heat, but do not boil, and serve. Be fully present to the comfort and pleasure of pumpkin soup.

Enjoy!

Sunday, October 25, 2009

Pork + Cider BFF

Oh, swoon

Recently I decided to cut back on meat. I started by reducing it to no more than once per day. I am now eating meat no more than once every two days. My eventual goal is to cut down to no more than once a week. Once, long ago, I was a vegetarian; so I know from past experience that soon I will not miss meat anymore.

Soon, but not yet. In the meantime, I am looking forward to meat days the way a little kid looks forward to Halloween. It’s going to be so fun! What am I going to be this time? Last time I went as a hamburger. Should I be ham? Should I be chicken? What about fish? Naaah, that’s not even scary.

Here’s the bottom line. If I’m going to spend all my time slavering in anticipation and fetishizing my dinner, then I’m going to make damn sure the meal is worth the wait. So when foodie friends were coming for dinner this weekend, I intended to show off for myself as much as for them. My lovely consort, Beth, had been to the farmers market and had a refrigerator full of kale, butternut squash, and red peppers. We wanted a deeply-flavored, appropriately autumny main dish to go with them. It was time for a pork shoulder simmered in the juice of its very good friend Apple.

Over hours of slow cooking, the crystal tang of apple cider seeps into every nook and cranny of the pork. A bone-in roast means super-rich flavor. Salt and pepper are the only other things needed to render one of the simplest and best meals you could ever hope to eat on a damp fall night.

Pork Braised in Apple Cider
The two secrets to a good braise are proper browning and a low cooking temperature. Get them right and you have intensely flavorful meat that falls right off the bone.
Serves 6.

2 T butter
A 3.5-lb bone-in pork shoulder roast
3 c apple cider or unfiltered juice
Salt and pepper to taste


  1. Melt the butter in a pot just large enough to hold the roast. Brown the meat on all sides. This will take you ten to fifteen minutes if you do it right. You want a good, even, caramelized crust. Watch carefully, and if the butter is getting too hot, turn down the flame.
  2. Pour half the apple cider or juice over the meat. Bring up to a boil, and then turn the heat to low. Cover the pan, leaving the lid a bit ajar.
  3. Simmer for an hour. Turn the meat over two or three times during this period.
  4. At the end of the hour, the juice should be somewhat reduced. Add the rest of the apple cider/juice, bring back up to a boil, and then turn back to low. Simmer another two hours. Keep checking and turning the meat every so often.
  5. Remove the roast from the pan and let rest while you do the next steps.
  6. Defat the pan juices. Put them over a high flame and boil them down until reduced to one and a half to two cups. Season to taste.
  7. Slice the meat, nap with a bit of the sauce, and serve the rest of the sauce at the table. I suggest you serve your pork dish with mashed squash or sweet potatoes. Slather pan juices all over those. Then check back here and tell me how all that worked out for you.

Mmm-hmm. You're welcome.

Sunday, October 18, 2009

Yes! You CAN Make Sauerkraut!


Sauerkraut!

If you grew up eating this sour-salty, fermenty, stinky-yummy food, then you had the opportunity to get to know and love it. If you grew up with people who made their own, then I'll bet you jump at the chance to eat fresh, homemade kraut. Not the canned grayish junk from the grocery store. I mean the crisp, golden-colored marvel with a flavor as complex and briny as that of any oyster. Fall time is sauerkraut time. To me, nothing says "ready for winter" like a crock of cabbage fermenting in my basement.

Sauerkraut, like other fermented and/or probiotic foods, may seem intimidating to make at home. Don't you need a bunch of fancy equipment? Don't you need cultures and starters? Don't you need a climate-controlled laboratory in a titanium chamber buried deep in the bedrock miles below your house?

As it turns out, no. Shredders and large crocks make the job go faster if you are preparing lots of kraut. But unless you need to feed a crew of Slavic laborers, then everyday kitchen gear will do. Read on!


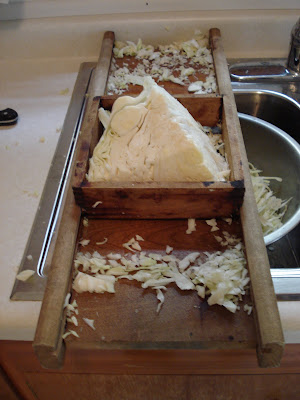
Shredding cabbage on the family kraut board


Speaking of Slavic laborers: My maternal grandfather's family came to Minnesota from Croatia about a hundred years ago. They brought with them the tradition of making and eating this economical and easy-to-store food. In a climate where fresh food is scarce for fully half the year, the Vitamin C and fiber in sauerkraut quite literally kept Grandpa's family alive and healthy through the winter.

In the early 1940s, when Grandpa married and set up housekeeping with my grandmother, they bought some Red Wing stoneware crocks in 1, 3, 5, and 10 gallon sizes; oak boards that my grandfather cut to fit inside and press down the cabbage as it works; and a kraut board. A few years ago, my grandmother passed this equipment to me. It is a sacred trust to be the guardian of these artifacts. It is a duty and a privilege to be entrusted to supply the sauerkraut needs of my extended family.

Every fall I buy the freshest cabbage I can get. I weigh it, shred it on the kraut board, salt it, and pack it tightly into the crocks. Within an hour, the cabbage has released enough juice to cover itself with a few inches of brine. It's time to move the crocks to a cool, dark place for the next few weeks. I put the presser boards on top of the cabbage, weigh them down with quart jars full of water, cover the arrangement with a clean cloth, and wait.


The cabbage making its own brine


The top of the brine needs skimming every couple of days. Pressing lightly on the boards will release a few bubbles of the carbon dioxide produced in fermentation. Other than these few tasks, the kraut demands nothing of me.

The kraut might be done in two weeks, or it might be done in six. It all depends on how cold it is in the basement. Colder temperatures mean longer fermenting times but also more flavorful kraut. I know I can rely on the sauerkraut to tell me when it's done: it will stop bubbling a few days before fermentation is complete. Then I'll have a look and a taste. The cabbage will have transformed from opaque white to a translucent straw color. Its characteristic flavor is the final test. The finished kraut can stay in its crock in a refrigerator-cold place, or it can be home-canned.

If you don't have a collection of seventy-year-old stoneware crocks, it's not a drama. You can use any glass, ceramic, or food-grade plastic container. A five-quart ice cream pail will work. Perhaps the best and easiest thing of all is a gallon-size Ziploc bag. You can seal all but a corner, press out all the air, and seal completely. Repeat this once a day and there will be no need to worry about skimming anything off. You won't be able to smell the fermentation, either—an advantage in an apartment or small home.

Sauerkraut
Buy the best cabbage you can find. The head should be dense and heavy, the leaves wrapped tightly. When you try to peel back a leaf, the rib should snap rather than bend. If the stem is still bleeding where the farmer cut off the cabbage's head, then you have picked a winner.

For each gallon of container capacity:
5 pounds of trimmed and cored cabbage
3 tablespoons of salt
Optional: 2 teaspoons of caraway seed or 3 tablespoons of juniper berries

    1. Work with five pounds of cabbage at a time. It is easiest to trim and core the head, then weigh the pieces before shredding.


    2. Shred the cabbage. Do this by hand rather than in a food processor, which will mush up the cabbage too much. A kraut board or other shredding device makes the work go by quickly. For just five pounds, though, a knife is not bad.


    3. Using your hands, mix the cabbage well with the salt and optional seasoning.


    4. Pack the cabbage into the container. Smack it in there tightly. Don't leave any air space in between pieces.


    5. If you are making more than 5 pounds in a large crock, repeat steps 1-4 until the crock is full (leave room for brine).

    6. Cover the top of the cabbage with a plate, board, cloth, or some whole cabbage leaves. Weigh it down with a well-scrubbed rock or some quart jars filled with water. If you are using a gallon bag, squeeze out all the air and seal. Cover with a clean cloth.

    7. Check daily to every other day, skim off any scum, and press out any new bubbles.

    8. When fermentation is done, it's sauerkraut! Call me up. I'll be over for dinner.

Wednesday, October 7, 2009

Roast me a chicken


When the weather turns cool, some people crave soup. But I always want a roast chicken. There's something about it that says fall, home, family, comfort, Sunday afternoon, and someone loves you enough to feed you.

Roast chicken is not hard, either. It's the dish that makes itself. You can spend fifteen minutes getting it ready, throw it in the oven, and spend the next hour lounging around reading. Perfect for a Sunday.

Since it's not quite hopelessly winter, there's still the possibility of using some fresh herbs from the garden (yours or Dehn's). I love the savory perfume that tarragon lends to a chicken. It's also fun to strew a few vegetables in the pan around the bird. Carrots, potatoes, and onions are de rigeur. Fennel ratchets it up from "bases covered" to "dreamy." Seriously, I'm going to swoon.

The really nice thing, though, is that with one more ounce of effort, you can have your soup after all. Pop the bones and trimmings into a stockpot for six hours, strain, and throw in any old vegetables in the house.

Roast Chicken Chez Amy
First off, two words: Kadejan Farms. Because happy chickens are tasty chickens.

1 chicken, about 4 lb
1 bunch tarragon
1 T butter
Salt
2 carrots
2 potatoes
2 onions
1 fennel bulb
2 T olive oil
Fresh ground black pepper
1/2 cup stock

1. Prepare the chicken: Stuff a sprig of tarragon under the skin of each thigh and each side of the chicken breast. Stuff the rest of the tarragon in the cavity. Rub the chicken all over with the butter and salt. Put the chicken breast side down in a wide roasting pan.

Oh, fine. If you will be all sad that you don't get crispy browned breast skin, then put the chicken breast side up. But if you are interested in juicy, perfectly cooked white meat, then try it my way just this once.

2. Peel the carrots and potatoes, or don't. Cut them into 4-8 pieces each. Quarter the onion. Halve/quarter and core the fennel, then separate it into pieces. Toss the vegetable pieces with the olive oil and black pepper. Arrange the vegetables around the chicken in one layer.

3. Roast the chicken at 400°for an hour. Stir the vegetables two or three times during the cooking. You'll know the chicken is done because the juices run clear when you stick a knife in the thickest part of the thigh. The chicken's thigh. Not yours, for G-d's sake!

just-a like-a this


4. Remove the chicken to a carving board and the vegetables to a serving dish, which you can keep warm in the turned-off and left-open oven during the next part. Let the chicken rest about 10 minutes, then carve it into serving pieces. If juice runs off, try to catch it and return it to the pan.

5. Remove as much of the fat from the pan as you can, leaving any pan juices that may remain. Set the pan over the burners of your stove on medium to high heat. Pour in about a half cup of stock. Scrape up all the browned bits of chicken and vegetable yumminess and stir that stock around as it boils. When it has reduced by about half, pour this sauce over the chicken pieces and serve to acclaim.

Bonus! Chicken soup!

1. When you are done with dinner, if there are leftovers, pull the meat off the bones. Don't scrape off every scrap, though. Leave some on there for flavor. Throw all those bones, hard-to-retrieve meat scraps, and skin into a stockpot. Add garlic, an onion, a carrot if you want. Put in the stems of tarragon left over from the roasting. Add some peppercorns. Or don't. You can't do this wrong.

2. Add water just to cover. Bring to a just-barely-simmer and cook, covered, for six hours or more. When the bones have all disconnected and fallen to the bottom of the kettle; when you taste a piece of the meat and it has no flavor; then you are done.

3. Strain out the solids and discard them. Chill the stock until the fat is a hard layer on top. Remove this fat with a spoon.

4. Put the stock back in a pot and simmer it until it is reduced to about five or six cups. Add whatever you want: the leftover chicken meat cut up; noodles; rice; any vegetables. You can add these things alread cooked or simmer them in the stock until they are done.

My new favorite combination is to add two sliced zucchini; two sliced carrots; a cut-up bell pepper; some cut-up hot cherry peppers; the leftover chicken meat; and six torn-up corn tortillas. Simmer this until the vegetables are cooked. The tortillas will disintegrate and add wonderful thick body to your soup. I hesitate to call this a posole, but maybe that's the closest word for it. Let's call it posole-inspired. It is even better the next day.

Enjoy!

Tuesday, September 29, 2009

Apple Tasting!

Honeycrisp Carries the Day


"I'm thinking about apples," said Kevin.

It's not unusual for my colleague to begin a conversation about food, and he always gets my attention with this gambit. "I'm interested in local apples, but I don't know much about the different kinds," he continued. And then Kevin outlined his idea for an apple tasting event sponsored by our workplace:

  • Someone would get lots of different apples.

  • Someone would prepare a blind tasting.

  • Then someone would provide information on what we had all just eaten.

Instantly I realized two things: 1. This mysterious "someone" was, of course, to be me; and 2. it would mean the opportunity to buy dozens and dozens of apples with the company's money. It would be like Christmas—make that Applemas—at the Apple Pole, and I would get to be Apple Claus.


A committee of coworkers loved Kevin's idea as much as I did. Fully funded, I trundled off to the Minneapolis Farmers Market to buy the goods. I marched straight up to my longtime favorite, Brian Fredericksen of Ames Farm, and bought a bag of everything he had. I swung by Fireside Orchard to pick up some more varieties. In twenty minutes, I had acquired nine kinds of apple: Honeycrisp, Honey Gold, Early Gold, Fireside, Chestnut Crab, Cortland, Haralson, Sweet 16, and Sugar King. My market bags strained under the weight of all those apples. I was the luckiest pack mule in the city.

Back at the office, committee members assigned secret codes to each variety, cut slices, and devised a voting system. Coworkers filed into the lunchroom, filled plates, and started nibbling. Soon the room filled with animated conversation, evaluations, comparisons, and opinions. People tasted, debated, retasted, and voted for their favorites. About 35 people cast ballots.


In the end, and to no one's surprise, Honeycrisp won the vote. Its cheerful red and yellow skin, crisp texture, strong apple flavor, and generous juice make it the universe's best apple. Honey Gold came in a close second. People liked its mellow pearlike taste, good crunch, and lovely greenish-yellow color. Little Chestnut Crab trailed by only a few votes for third, but everyone was charmed with its diminutive size and spicy pear notes.


No, we did not try SweeTango—we couldn't find it! But we're a marketing company. We know that if the buzz is true, then a successful apple will be around for the long haul. We'll catch it on the next sales cycle.


Cutting up a Honeycrisp


Filling up plates


Kevin's logically organized plate


Tasting notes from colleague Kathy (click to enlarge photo)


Sunday, September 27, 2009

Parsley Overload? Tabouleh Is the Answer


There's too much parsley!

My garden is full of lush, rich green, glossy Italian flat-leaf parsley. The little sprig from Dehn's Garden that I planted in springtime has erupted into a leafy mound, all but smothering its neighboring plants.

October comes this week, and I'm in a produce panic. If I don't use this parsley, then spiteful frosts will just take it all away from me. I'm madly trying to eat a whole summer's worth of fresh herbs in the dwindling weeks of warm weather that remain. How am I going to manage it?

Tabouleh to the rescue!

If you hunt around, you will find there is no one way to make (or spell) tabouleh. The common elements, though, are finely chopped vegetables, bulgur, oil, lemon juice, and fistful upon fistful of chopped herbs. This is one of the few dishes I know that features parsley instead of relegating it to sideshow status or including it as an also-ran aromatic. In tabouleh, parsley is no mere Miss Congeniality. It gets to stand in the spotlight and sing its own song. Its bracing, clean taste makes this light dish pop with fresh, green flavor and color.

If I were you, I'd march into the garden and scythe down a huge hank of parsley. If you don't, then winter will most assuredly do it soon. Tastes better this way, trust me.

Tabouleh

To measure whole herb leaves, pack as many into the cup as you can make fit. This will be a pretty good measure of how much chopped herb you'll get from them.

2 c boiling water
1 c bulgur
2 ripe tomatoes
1 small onion
2 c parsley leaves (or any giant bunch of parsley you have)
1 c mint leaves
1/3 c olive oil
1/3 c fresh lemon juice
Salt and fresh ground black pepper

Stir the bulgur into the boiling water (off the heat) and cover. Let sit for 1/2 hour.

Meanwhile, chop the onion and tomato finely. Chop up the parsley and mint too. Whisk the olive oil and lemon juice together.

When the bulgur is ready, put it in a sieve and press it to drain off the extra water. Put everything together in a bowl, add salt and pepper to taste, and mix it up thoroughly.

You can serve this chilled or room temperature. You can serve it on a bed of romaine if you are feeling particularly freaked out about summer being over.