I went to a part last Saturday night, I told you that story, it’ll be all right, uh huh.
It ain’t no big thing.
Late for my job and the traffic was bad, had to borrow ten bucks from my old man, uh huh.
It ain’t no big thing.
But I know what you like:
With apologies to
Lita Ford.
Mojitos by the pitcher
3 limes
1 handful mint leaves
1½ c simple syrup (make by shaking 1 c sugar and 1½ c water in a jar until clear)
2 trays ice cubes
1½ c rum—I like Flor de Caña and I like it dark
2 c fizzy water
Throw the mint leaves in the bottom of a pitcher. Quarter the limes and squeeze each quarter into the pitcher. Take a wooden spoon and mess things up in there; smash up those mint leaves a little. (This is the famous muddle.) Add the syrup, fill up the pitcher with ice, then pour in the rum and fizzy water. Stir and serve.
Drink while wondering, “What is she doing to that guitar? And why?? And what is that beadwork snail doing on the cutting board? What the hell exactly is this post about, anyway?”
Showing posts with label tomatoes. Show all posts
Sunday, August 12, 2012
Sunday, June 10, 2012
Lasagna Is Not an Appropriate Summer Dish
“Why are you making lasagna when it’s 9 billion degrees outside?” tweeted @amycrea, a tweeple who has become an IRL friend. (And who ought to know better than to ask.)
Why? Why?? What do you mean, “why?”
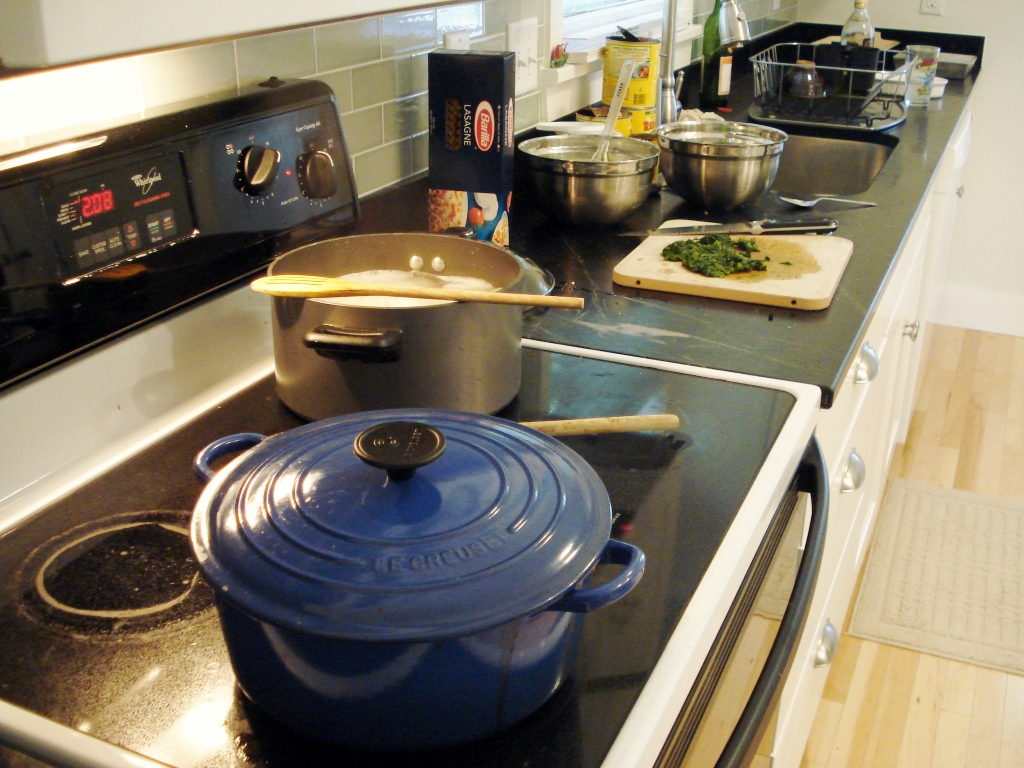
- I got a new blue Le Creuset earthenware pan for my birthday! Yay! Now I’m feeling adventurous!
- I read an article about lasagna on Slate.com in a series called “You’re Doing It Wrong.” Nothing pisses me off more than being told by Internet hipsters that I’m doing something wrong. Plus, for someone who’s telling everyone they’re doing it wrong, the author holds a rather shallow understanding of what makes a good tomato sauce. Rrr! Now I’m feeling vindictive!
- I have promised to bring dinner to my friends Deb and Sean, who are new parents. Now I’m feeling all protective.
Ridiculous, Ridiculous, Ridiculous
I followed Slate’s suggestion and made mushroom lasagna, except they don’t know what they’re doing so I fixed their recipe. They ARE right, however, about ingredients: get the best stuff you can find. There are three parts to the recipe: sauce, cheese filling, and assembly.
| The ingredients PLUS a beadwork snail |
Sauce
Olive oil
1 onion, chopped
½ head garlic, chopped
½ to 1 lb mushrooms, chopped
1-2 sage leaves 1 t dried rosemary
3 cans crushed tomatoes
1 can tomato paste
1 cup wine
1 big sprig basil, leaves plucked and torn
Salt and pepper to taste
| I overfilled ol' Bluie again. Relax, though, it's a double recipe |
Cheese Filling
1 lb fresh spinach
1 lb ricotta cheese
8 oz shredded parmesan, pecorino, asiago, or other dry aged Italian cheese. Hey, shut up. No jokes about my grandma!
1 egg
A dash of freshly grated nutmeg
Salt and pepper to taste
Wash and steam the spinach. Drain it, turn it out onto a cutting board, and chop it. When it is cool enough, squeeze as much water out of it as you can.
Whisk the egg in a medium bowl. Dump in everything else and blend.
| Giant mess |
1 lb lasagna noodles
Olive oil
1 lb mozzarella cheese (fresh or shredded, either is fine.)
Cook the noodles according to the package – I’d throw several tablespoons of salt into four or five quarts of water and boil them in that. Pull them out of the water and drain them, then toss them with a little olive oil to keep them from getting sticky.
Preheat the oven to 375°. (On this, Slate and I agree.) Grease your big old lasagna pan with olive oil, then coat the bottom with sauce. Put down a layer of noodles. Then spread another layer of sauce; drop half the cheese filling in little blobs all over the sauce and smooth it out into a layer as best you can. Put noodles atop this. Do sauce, cheese filling, noodles again. Top with a thin layer of sauce and then cover it up with mozzarella.
| Just-a like-a that. |
Bake the lasagna until it’s toasty on top and bubbly on the bottom. Watch it carefully, and if it is melted and bubbly but not toasty, you may want to run it under the broiler for a minute or three.
Remove the lasagna from the oven and take the time to make a salad before slicing it and serving to acclaim.
Mangiamo!
Wednesday, September 7, 2011
Just sayin'
Caprese salad with three kinds of tomato, homegrown basil, and Valli dell’Etna “Etna Dario” olive oil; peppers, zucchini, and eggplant sautéed with garlic and onions.
Thursday, March 17, 2011
Swiss Seitan
I’ve just come home from vacation, and my kitchen looks like this:
See what I got? A problem! See what I don’t got: no stove, no sink, no countertops, no nothing. I’m tired; I’m crabby; I have to go to work instead of gad about all day in the sun with my girl. And now I have nothing to eat and nowhere to cook it.
But look! The workmen had to move some stuff out of the storage room to get at the electrical panel. Look what they unearthed!
It is my mom’s electric fry pan. She got it for a wedding present in the late 1960s. I drew the yellow lines around it to show off its majesty.
Well if this thing is here, then I am halfway to a good dinner. How about if I get out Mom’s Better Homes New Cookbook? It’s appropriate to the era.
Yeah, it was new back in the day, but not anymore. This might also have been a wedding present. What are these doing in my house?! Who can remember, and right now, who cares. These things are my ticket to some not-microwaved meals. Look at this goofy book:
“Men’s favorite?” With all due respect, men, who cares? I don’t need your approval to decide whether it’s good. And, in men’s defense, why does the Better Homes and Garden’s New Cookbook presume to know the salad preferences of half the human race? As my feminist scholar sweetheart would say, “It’s problematic.”
Oh get a load of this one:
This picture both co-opts, and eviscerates the potency of, the 1960s ethic of drugged-out spiritual exoticism. Nothing could be squarer than Susie Homemaker here, but she is all Lord Shiva on your ass with her Jiffy Cooking. Her dance both creates a meal from canned and frozen foods in 20 minutes and destroys any chance you might have had of enjoying home-cooked flavors from fresh ingredients. As an added ironic bonus, many people (possibly including the editors) may have missed the significance of this visual reference.
Enough ripping on Mom’s book. It is, along with its friend Electric Fry Pan, going to feed my ungrateful face. I deem Swiss steak to be a properly kitschy thing to cook. Also it has few ingredients and I have no prep space. Here are the directions.
As you see, it’s not a recipe. It’s truly just directions.
I don’t want to be as meat-tastic as things were in the 1960s. So I’m substituting seitan for beef. I’m not pounding in any flour or seasonings because seitan is already made of flour and seasonings. I’m also not going to simmer it until it’s tender because it’s already tender. I’m just going to whip it up and then steam a few potatoes in the microwave. No problem!
Look at it! It’s cooking like gangbusters, and it is starting to smell decidedly midcentury here in my basement.
And in twenty minutes, it’s food. I am just like Jiffy Cooking Lord Shiva Apron Lady.
Is it any good? Mmmehhhhhh… it’s problematic.
See what I got? A problem! See what I don’t got: no stove, no sink, no countertops, no nothing. I’m tired; I’m crabby; I have to go to work instead of gad about all day in the sun with my girl. And now I have nothing to eat and nowhere to cook it.
But look! The workmen had to move some stuff out of the storage room to get at the electrical panel. Look what they unearthed!
It is my mom’s electric fry pan. She got it for a wedding present in the late 1960s. I drew the yellow lines around it to show off its majesty.
Well if this thing is here, then I am halfway to a good dinner. How about if I get out Mom’s Better Homes New Cookbook? It’s appropriate to the era.
Yeah, it was new back in the day, but not anymore. This might also have been a wedding present. What are these doing in my house?! Who can remember, and right now, who cares. These things are my ticket to some not-microwaved meals. Look at this goofy book:
“Men’s favorite?” With all due respect, men, who cares? I don’t need your approval to decide whether it’s good. And, in men’s defense, why does the Better Homes and Garden’s New Cookbook presume to know the salad preferences of half the human race? As my feminist scholar sweetheart would say, “It’s problematic.”
Oh get a load of this one:
This picture both co-opts, and eviscerates the potency of, the 1960s ethic of drugged-out spiritual exoticism. Nothing could be squarer than Susie Homemaker here, but she is all Lord Shiva on your ass with her Jiffy Cooking. Her dance both creates a meal from canned and frozen foods in 20 minutes and destroys any chance you might have had of enjoying home-cooked flavors from fresh ingredients. As an added ironic bonus, many people (possibly including the editors) may have missed the significance of this visual reference.
Enough ripping on Mom’s book. It is, along with its friend Electric Fry Pan, going to feed my ungrateful face. I deem Swiss steak to be a properly kitschy thing to cook. Also it has few ingredients and I have no prep space. Here are the directions.
As you see, it’s not a recipe. It’s truly just directions.
I don’t want to be as meat-tastic as things were in the 1960s. So I’m substituting seitan for beef. I’m not pounding in any flour or seasonings because seitan is already made of flour and seasonings. I’m also not going to simmer it until it’s tender because it’s already tender. I’m just going to whip it up and then steam a few potatoes in the microwave. No problem!
Look at it! It’s cooking like gangbusters, and it is starting to smell decidedly midcentury here in my basement.
And in twenty minutes, it’s food. I am just like Jiffy Cooking Lord Shiva Apron Lady.
Is it any good? Mmmehhhhhh… it’s problematic.
Monday, September 27, 2010
¡Vivan Chiles Rellenos!
If you’re all wondering what to do with a poblano pepper, then you should go stuff it.
Har har har! No, really. And then you should batter it and fry it and serve it with a bunch of its friends.
Perhaps once a year I make chiles rellenos (say “ray-YAY-nohs.” Do not call them “reh-lennowz” unless you are still eating tor-til-ah chips.) from Diana Kennedy’s The Art of Mexican Cooking. To me, they epitomize the complexity of Mexican food. Even the most seemingly simple Mexican dish can involve multiple cooking methods and several iterations of processing. Making rellenos is like making four different dishes: roasting, peeling, and seeding the chiles; making the stuffing; making the sauce; and, finally, battering and frying the chiles. Add some side dishes to the meal, and you could be cooking all day a la Like Water for Chocolate.
Chiles Rellenos
There are four stages: the chiles, the sauce, the filling, and the frying. Finally, we eat!
The Chiles
You can stuff any pepper, but traditional cooks use the poblano. These dark green, glossy triangles are relatively mild and about the size of a fist. Start with more chiles than you’re planning to serve; I promise at least one of them will end up in shreds while you are preparing it. Roast them on a grill or under a broiler, then peel them (here’s how). Find the weakest part of the chile, slit it open lengthwise, and sweep out the seeds and veins, being careful not to tear the flesh. You may need to wipe off your fingers, or your chile, with a towel as you work. Put the cleaned chile on a plate or cookie rack. You can do this a day ahead.
The Sauce
According to Kennedy, rellenos are traditionally heated up in a sauce—essentially, a very simple tomato reduction thinned with chicken broth. I opted to skip the broth and ended up with a tangy and fresh-tasting tomato sauce. You can make this ahead of time.
2 or 3 tomatoes
2 T chopped onion
1 clove garlic, chopped
1-2 T oil
Salt to taste
Put the tomatoes, onion, and garlic in a blender and liquefy. Heat the oil in a well-seasoned skillet. Dump in the tomato mixture and fry until reduced, maybe 5 or 10 minutes. (At this point Kennedy has you add 2 ¼ cups of chicken broth and cook 5 minutes more.) Salt to taste.
The Filling
Recipes abound for the relleno, or stuffing, part of chiles rellenos. You can use seasoned meat, or maybe potatoes and chorizo. I found queso Chihuahua, the quintessential Mexican melting cheese, at the Wedge. Muenster would be the next best choice. I cut it in strips about the size of my index finger. A large poblano will take two or three of these pieces; for a tiny chile, I cut one in half.
Put cheese inside the chile, being careful not to tear it. The chile should be nice and full, but the sides of the hole should overlap a bit. If you opt to close the slit with a toothpick, be sure to warn your guests.
The Frying
Cover a plate with several layers of paper towels and put it in the oven at 200° F. Get out a big frying pan and pour in about an inch of oil. Canola is nice. Put the pan on a medium-high burner.
Now make the batter. For every four to six big chiles, get these things:
3 eggs
¼ t salt
⅓ c flour
Separate the eggs. Beat the whites until they are stiff and turning dry. Beat in the yolks, one by one, and the salt.
OK, here we go. It’s showtime. I always get very scared at this point. I’m convinced that the chiles will come apart, stick to the pan, catch on fire, splatter everywhere, or burn black. But not one of those things has ever happened. They always fry up like magic.
Hey, look at that! It worked!
Let’s eat!
If you did the broth thing, you can put the rellenos in the sauce and heat them up for five minutes or so. Otherwise, plate ‘em up! Serve each guest one big chile or two smaller ones. You can pool the sauce under them or nap it on top.
¡Buen provecho!
Wednesday, August 25, 2010
These Beans Are Greek to Me
How Greek is this dish? Heck if I know. I had it on vacation two weeks ago in a restaurant called Ethos. The hostess had a large swooping mane of platinum-colored hair and a flowy tiger-striped blouse. She kept the waiting list in her head and seemingly knew what every single person in the restaurant, whether staff or customer, was doing and what they needed next. She was born to be a maîtresse d’hôtel.
That staff of hers is great, too. Our server knew not only every dish, but every one of a dozen fish on the menu by their Greek and English names. Some of them were catch of the day. She knew all those fish well enough to have a favorite.
She brought a green bean dish with a sharpish-tasting tomato sauce. There was a subtly sweet, woodsy undertone to it, though, that I could not place. Finally I found and identified the culprit: whole allspice. Who would expect to find that at a Greek restaurant?
Well, when your mouth is full of something good, you don’t need to know what’s Greek. You just need to enjoy.
Ethos Green Beans
The allspice berries at Ethos were nearly tasteless, their deliciousness having escaped into the sauce via stewing. My guess is that the chef starts a batch of the sauce in the afternoon and then keeps it on the back burner all night. When the kitchen receives an order for this dish, maybe Chef scoops up a dollop of sauce, tosses in the beans and dill, and then simmers them tender while he or she makes the rest of the meal.
2 T olive oil
1 small onion, chopped
1 clove garlic, minced
2 cups chopped tomatoes (I used a pint of cherry tomatoes plus one small beefsteak tomato)
½ cup white wine
3 allspice berries
A sprig of oregano
1 lb green beans
2-3 T chopped fresh dill
Salt and pepper
Heat the olive oil in a wide-bottomed, deep pan. Sauté the garlic and onion until translucent. Toss in the chopped tomatoes and fry them a bit until the pan starts to dry out. Add the wine, allspice, and oregano. Turn down the heat, cover the pan, and simmer for fifteen or twenty minutes. Check the pan often and throw in some water if things are getting too dry. It would be best if the dish could simmer on low heat for a long time, but if there isn’t time for that, cook it harder. The idea is for the tomatoes to break down into a thin sauce.
Throw in the green beans and the dill, stir, and cover the pan again. Let the pot stew, stirring occasionally, until the beans are quite tender, perhaps ten minutes or more. They will not be the bright green of steamed beans; they will start to turn olive-colored.
For the last minute or two, take the cover off the pan and check the thickness of the sauce. It should be thin but with some body, like gravy. You may need to let some extra water steam off.
Season to taste. Yum!
Sunday, August 15, 2010
Summer Swoon
Like a fool, I went on vacation. Why did I do it?! August is my favorite food time of year in Minnesota! Everything is ripe to bursting. All my favorite fruits and vegetables are peaking: corn, zucchini, tomatoes, basil, eggplants, cherries, berries, melons, peaches, and on and on and on.
I came home to an enormous CSA farm share full of impossibly lush corn, beans, tomatoes, peppers, basil, melons, and raspberries. I’m equal parts frantic and ecstatic, so the only reasonable thing to do is faint.
When I pick myself up off the floor, I will go straight to the kitchen and cook this stuff. Summer cooking should, in my opinion, be fresh and immediate. You should be able to march out to the garden in the middle of a recipe and pick something to put in the dish. The prep should be simple and the cooking time short.
Today’s blog is a twofer because I’ve been neglecting you all. I have here a pair of dishes with summer vegetables and their good friend olive oil.
Corn and Radish Salad
This recipe came out of the Southwest Journal a couple of years ago, and I tweaked it a bit. It’s a great thing to do with leftover corn on the cob. Ha! As if there’s ever anything left over of THAT.
Dressing for 4 cups of corn
A jalapeno pepper, seeded and chopped
Juice of ½ lime
1-2 t honey
¼ t ground cumin
¼ c olive oil
Salt and fresh ground pepper
Put these in the food processor or blender and liquefy them as you prepare the other ingredients.
The salad: Make it by the ear!
4 or 5 ears of cooked corn
6 radishes, halved and sliced (1 or 2 radishes per ear)
¼ c coarsely chopped Italian parsley (1 or 2 sprigs per ear)
1-2 T sliced or minced onion (a scant teaspoon per ear)
Slice the kernels off the cob. You do this by holding the cob on end and sawing a sharp knife down the side of the cob. Don’t dig too deep or you’ll cut into the cob; aim to cut off around three rows at a time.
Put all the salad ingredients in a bowl and toss them with the dressing. That’s all!
Zucchini Stewed with Tomato
Stewing a zucchini is not the same as stewing a chicken. It takes minutes, not hours. You can start this dish and throw it on the back burner while you toss a salad, and they will be done at the same time.
1-2 T olive oil
1 small onion, diced
2-3 cloves garlic, chopped
A pound of zucchini and/or pattypan squash, sliced into thick rounds
One or two large fresh tomatoes, chopped, or 1 to 2 cups of canned tomatoes (I found one jar left from last summer)
A handful of fresh basil leaves, torn
Salt and pepper to taste
Heat the oil in a large skillet and sauté the onion until translucent. Toss in the garlic and stir it around for a minute.
Add the squash and sauté until it begins to get tender, about four or five minutes. Add the tomatoes and, if needed, enough water so that the squash pieces are swimming just a little bit. Turn the heat down to medium-low and cover, stirring occasionally, for five minutes.
Have a look: the squash should be tender and the tomatoes should be thickened, not watery. If it is too soupy in there, uncover and cook off some of the water. Add the basil for the last minute of cooking, then season with salt and pepper.
Sunday, February 7, 2010
Love, Betrayal, Spaghetti Sauce
Yesterday was my mother’s birthday. She and my stepdad came to eat a Char’s Birthday Dinner. And afterwards, Mom retold some food stories about her immigrant grandparents, who arrived at an Italian-American community in Northern Minnesota around the 1910s–1920s.
Mom told how her nonno, her grandfather, was famous for being the best winemaker in town. How her nonna would grind pork, beef, and spinach together to fill ravioli. How Nonna didn’t teach her own daughter, my grandmother, to put wine in the tomato sauce. How Grandma found out one day because Nonno was watching her make a sauce in her own kitchen and asked, “Where’s the vino?”
To this I say: a) What the hell?! and b) Thank goodness.
Now, it’s family lore that Grandma and her own mother were not close. In fact, they were downright uncomfortable around each other. Grandma’s father had died when she was small, and Nonna had remarried. There was a large blended family of Grandma’s sibling, half-siblings, and stepsiblings to help the two keep their distance from each other. But even so, what the hell was Nonna thinking, keeping the wine a secret? Did she see her firstborn child as a painful reminder? A disappointment? A rival? What could have been more powerful than the responsibility to teach her daughter to cook? What could motivate a culinary betrayal of this caliber?
Whatever it was, thank goodness Nonno wasn’t clued in to the scheme. And thank goodness he was the sort to poke his nose into the cooking pots. Because if he hadn’t, would Grandma ever have learned the trick? Would Mom have found out? Would I?
Today I am cooking up a pot of the family sauce. My home is filled with the smell of wine and tomatoes, a familiar perfume that saturates my memories of growing up in my mother’s house. This sauce is, to me, the most important relic of a world that will disappear forever someday when Mom’s memory of it fades away. But since she never made any secrets about how to cook this recipe, our heritage will maybe linger on the stove for a few more generations.
Nonna’s Sugo
Nonna made this with round steak or chicken, according to Mom, who makes it with ground beef or meatballs. I am making it with mushrooms today.
The carrot fixes it so you don’t have to put sugar in the sauce. My brother and I used to fight over the carrot, so Mom got smart and started putting in two.
2 T butter
3-4 big fat cloves of garlic, minced
1 large onion, chopped
1 lb Something (beef, chicken, sliced mushrooms—whatever you want, I guess)
3 pints tomato purée
2 oz or more of tomato paste
2 c fruity red wine
2-3 t dried oregano
2-3 t dried basil or marjoram
1 big, thick carrot, peeled
Melt the butter in a heavy-bottomed pot over high heat. Sauté the garlic and onions until translucent. Add the Something and sauté until browned, if meat, or tender, if mushrooms.
Add the rest of the ingredients and stir well. Let the sauce come up to a bubble, then turn down to a low simmer. Cover loosely or leave uncovered. Cook for hours and hours and hours until the carrot starts to melt into the sauce. For best results, you should drag this out all day long until the carrot completely dissolves. But if you are in a big hurry, I guess you could simmer for just three hours. The sauce should be a deep, rich red and reduced in volume by a third to a half. Add salt to taste.
Mom told how her nonno, her grandfather, was famous for being the best winemaker in town. How her nonna would grind pork, beef, and spinach together to fill ravioli. How Nonna didn’t teach her own daughter, my grandmother, to put wine in the tomato sauce. How Grandma found out one day because Nonno was watching her make a sauce in her own kitchen and asked, “Where’s the vino?”
To this I say: a) What the hell?! and b) Thank goodness.
Now, it’s family lore that Grandma and her own mother were not close. In fact, they were downright uncomfortable around each other. Grandma’s father had died when she was small, and Nonna had remarried. There was a large blended family of Grandma’s sibling, half-siblings, and stepsiblings to help the two keep their distance from each other. But even so, what the hell was Nonna thinking, keeping the wine a secret? Did she see her firstborn child as a painful reminder? A disappointment? A rival? What could have been more powerful than the responsibility to teach her daughter to cook? What could motivate a culinary betrayal of this caliber?
Whatever it was, thank goodness Nonno wasn’t clued in to the scheme. And thank goodness he was the sort to poke his nose into the cooking pots. Because if he hadn’t, would Grandma ever have learned the trick? Would Mom have found out? Would I?
Today I am cooking up a pot of the family sauce. My home is filled with the smell of wine and tomatoes, a familiar perfume that saturates my memories of growing up in my mother’s house. This sauce is, to me, the most important relic of a world that will disappear forever someday when Mom’s memory of it fades away. But since she never made any secrets about how to cook this recipe, our heritage will maybe linger on the stove for a few more generations.
Nonna’s Sugo
Nonna made this with round steak or chicken, according to Mom, who makes it with ground beef or meatballs. I am making it with mushrooms today.
The carrot fixes it so you don’t have to put sugar in the sauce. My brother and I used to fight over the carrot, so Mom got smart and started putting in two.
2 T butter
3-4 big fat cloves of garlic, minced
1 large onion, chopped
1 lb Something (beef, chicken, sliced mushrooms—whatever you want, I guess)
3 pints tomato purée
2 oz or more of tomato paste
2 c fruity red wine
2-3 t dried oregano
2-3 t dried basil or marjoram
1 big, thick carrot, peeled
Melt the butter in a heavy-bottomed pot over high heat. Sauté the garlic and onions until translucent. Add the Something and sauté until browned, if meat, or tender, if mushrooms.
Add the rest of the ingredients and stir well. Let the sauce come up to a bubble, then turn down to a low simmer. Cover loosely or leave uncovered. Cook for hours and hours and hours until the carrot starts to melt into the sauce. For best results, you should drag this out all day long until the carrot completely dissolves. But if you are in a big hurry, I guess you could simmer for just three hours. The sauce should be a deep, rich red and reduced in volume by a third to a half. Add salt to taste.
Use a spoon to find every last piece of carrot. Make sure they are evenly divisible by the number of people who will be mad if they don’t get some. If no one is looking, eat the odd carrot piece quickly before anyone finds out. Careful, it’s hot.
Serve over pasta. Mangiamo!
Sunday, September 27, 2009
Parsley Overload? Tabouleh Is the Answer
There's too much parsley!
My garden is full of lush, rich green, glossy Italian flat-leaf parsley. The little sprig from Dehn's Garden that I planted in springtime has erupted into a leafy mound, all but smothering its neighboring plants.
October comes this week, and I'm in a produce panic. If I don't use this parsley, then spiteful frosts will just take it all away from me. I'm madly trying to eat a whole summer's worth of fresh herbs in the dwindling weeks of warm weather that remain. How am I going to manage it?
Tabouleh to the rescue!
If you hunt around, you will find there is no one way to make (or spell) tabouleh. The common elements, though, are finely chopped vegetables, bulgur, oil, lemon juice, and fistful upon fistful of chopped herbs. This is one of the few dishes I know that features parsley instead of relegating it to sideshow status or including it as an also-ran aromatic. In tabouleh, parsley is no mere Miss Congeniality. It gets to stand in the spotlight and sing its own song. Its bracing, clean taste makes this light dish pop with fresh, green flavor and color.
If I were you, I'd march into the garden and scythe down a huge hank of parsley. If you don't, then winter will most assuredly do it soon. Tastes better this way, trust me.
Tabouleh
To measure whole herb leaves, pack as many into the cup as you can make fit. This will be a pretty good measure of how much chopped herb you'll get from them.
2 c boiling water
1 c bulgur
2 ripe tomatoes
1 small onion
2 c parsley leaves (or any giant bunch of parsley you have)
1 c mint leaves
1/3 c olive oil
1/3 c fresh lemon juice
Salt and fresh ground black pepper
Stir the bulgur into the boiling water (off the heat) and cover. Let sit for 1/2 hour.
Meanwhile, chop the onion and tomato finely. Chop up the parsley and mint too. Whisk the olive oil and lemon juice together.
When the bulgur is ready, put it in a sieve and press it to drain off the extra water. Put everything together in a bowl, add salt and pepper to taste, and mix it up thoroughly.
You can serve this chilled or room temperature. You can serve it on a bed of romaine if you are feeling particularly freaked out about summer being over.
Sunday, September 6, 2009
Five Reasons to Can Your Own Tomatoes
- You’re in charge. When you can your own, you are in total control of what’s in and what’s out. Salt? Garlic? Basil? You get to dictate how much, if any, go in. Plus there are no worries about what ooky plastic was used to line the tomato can, because your cans will be made of glass.
- It’s an event. Make a canning date with friends or family, then share the work. You can make one giant day of it and put up a whole winter’s supply for your household. Or you can grab a friend, cut a morning’s work down to just a couple of hours, and each walk away with a few quarts.
- It’s an economical present. Even if you buy brand-new jars with no expectation of getting them back, you can make a quart of tomatoes for under five bucks. (If you grow your own tomatoes and retrieve/reuse your jars year after year, then it’s almost as cheap as free.) Trust me, people are more than five bucks’ worth of impressed with them at Christmastime.
- It stretches out summer. Here’s the answer to “How am I supposed to eat local food during the winter?” Just take summer with you. Instead of giving away gluts of garden produce or walking past amazing deals at the farmer’s market, make the season last by sealing it in a jar.
- It’s tradition. No, wait, it’s trendy. Um… Oh. Well, I’m a fourth-generation American and my family has been preserving food here since arrival. But America is also in the midst of a home-canning revival. Whether you grew up doing it or you learn how online, canning is easy enough to get right the first time.
Tomatoes by the Quart
This recipe comes from a 2002 pamphlet called “The Great Tomato Primer,” reincarnated as a Web site here.
For each quart, you need
2 ½ - 3 ½ lb tomatoes
2 T Lemon juice (not optional—needed for safe levels of acid)
1 t salt (optional)
- Wash your jars, lids, and rings in hot soapy water. Rinse and put the jars in the canner, fill the jars and canner with water, and put on to boil. Put the lids and rings in a pan of water over low heat. You’ll want those hot, but not boiling.
- Wash the tomatoes and drain. Dip tomatoes in boiling water for 1 minute. Peel, core, and halve or quarter.
- Put the tomatoes in a pot. (There should be some liquid, too, and the tomatoes will make it themselves.) Boil gently for 5 minutes.
- By now, the canner should be boiling. Pull out the jars and set them, empty, on a clean towel. Put the lemon juice and salt in the jars. Set your canning funnel on the first jar.
- Fish the tomatoes out of their juice with a slotted spoon and pack the hot jars, leaving ½ inch headspace from the top. You can top off the tomatoes with a little of their juice if you need it to fill the quart.
- With a clean cloth, wipe off the rim and threads of the jar. The rim must be completely free of food to form a good seal.
- Fit the hot lid and ring onto the jar. Tighten the ring only until you meet resistance. Do not screw the rings on too tightly because air has to be able to escape the jar as it processes.
- Immerse the jars in the canner and process for 45 minutes, counting from when the water starts boiling again. You should see it bubbling up between the jars.
- Remove the jars from the canner and set on a towel in a quiet corner. Cover them with another towel to slow their cooling and protect them from breezes. When you hear a metallic PING, it’s because one of your jars has vacuum-sealed. Give them a little cheer! That encourages the others.
Subscribe to:
Posts (Atom)