Sunday, December 18, 2011

Venison, Wild Rice, and Squash!


A new job means new adventures, right? Well at least it means new colleagues—and, as it happens, a new window on the world of food.

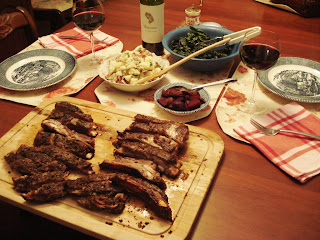
My colleague Angi’s family are deer hunters, and they shot one this season. I’d been hearing about this dead deer for days: it was hanging in the garage. Angi had to bump past it every day to and from work. Her kids wanted to play with the legs. Her husband made sausage, which she did not want to help eat.

I must be doing something right, because guess what Angi brought me!


And I have a lot of little squashes piling up from my CSA, too. How fun would this be: squashes stuffed with a sausage and wild rice filling thing?

I chose three Sweet Dumpling squashes, each about the size of my two fists. I cut them in half, scooped out the seeds, and set them cut-side down on a rimmed baking sheet. I propped up each squash half on the rim of the sheet—like propping up a lid on the edge of a pot—so they weren’t flat on the metal.

While they were baking, I made a half recipe of fruited wild rice pilaf from a recipe card I found at Kowalski’s Market. I cut the recipe in half, fried up a cup of sausage, and mixed it in.
Then I stuffed my little squash friends full of fruity venison sausagey wild rice pilaf. Aren’t they cute? There was rice left over, so I could have made more or bigger squashes.

The dish was rich and sweet with a bit of tang from the fruit, chewiness from the wild rice, and crunch from the pecans in the recipe. Sage, stock, and aromatics permeate the rice. This would be good with a crisp salad of bitter greens. I pronounce it yummy. Thanks, Angi!

Sunday, November 27, 2011

Just Sayin'


Fried egg sandwich with eggs from Bar 5, peas & carrots microgreens from Bossy Acres, and bacon jam made out of Tollefson’s pork from the recipe at Kelli Abrahamian’s blog I Had a Delicious Time. Thank you, Minneapolis and Kingfield Farmers Markets.

Saturday, November 19, 2011

Perfect Pecan Pie!

Artist’s conception - real pic below!

In a rare instance of Amy Boland posting a holiday recipe in advance of a holiday, here’s the pecan pie I made last Thanksgiving and plan to make again!

There are two reasons to like this pie. One, it is full of deep, dark, sugary-buttery-caramely-toasty flavors. Two, it calls for bourbon and I don’t know anything about the stuff. I get to learn! Yay!

Last year I blindly got a pint of Wild Turkey. This elicited reactions ranging from indifference to dismay in the bourbon drinkers of my acquaintance.

This year I went to South Lyndale Liquors—where they will, upon request, pour you tiny tastes of booze from sample bottles lined up on the barrelheads of actual casks conditioned specially for them to sell. The guy who poured for me also explained what I was tasting and why the flavors were there. I chose Buffalo Trace.

So now I feel I have picked a winner, and I’m going to have plenty of bourbon left over afterwards. Um. Pie-making party at my house?

Oh, wait, yeah, the PIE! This IS supposed to be a post about pie.

Perfect Pecan Pie
Post-Thanksgiving pie pic update

I copied this recipe out of a column in the Star Tribune in 1997. Usually I don’t post recipes I didn’t create or significantly modify, because I think the person who wrote the recipe should get the credit (and should get stuck doing the typing). But since I don’t think we can go back in time and purchase a copy of the newspaper from an unknown day in late fall 1997, I’m prepared to make an exception.

Also I recall from my glamorous youth, when I worked on food books at a children’s publishing company, that the Copyright Guardians consider recipes to be formulae. So I’m not running afoul of the law, either. Potential haters, please make a note.

1 c dark brown sugar
⅔ c cane syrup OR ⅓ c light corn syrup and ⅓ c dark molasses
¼ c unsalted butter
3 T bourbon
½ t vanilla
½ t salt
4 eggs
2-3 T half & half
2 heaping c pecan pieces
1 unbaked single 9” pie crust
A big handful of pecan halves

Heat oven to 350°. Melt the sugar, syrup, butter, bourbon, vanilla, and salt together. Heat to boiling and boil one minute, stirring constantly. Let cool.

Beat the eggs with the half & half until frothy. Add this to the syrup, beating until well mixed. Stir in the pecan pieces.

Pour into the pie shell and top with a layer of pecan halves. (Make it look pretty.) Bake 45 to 50 minutes or until a toothpick comes out clean. Serve warm or at room temperature.

Monday, November 14, 2011

My Best Chocolate Cake


“It’s your second-best cake,” Beth corrected.

“It is NOT! You don’t know,” I argued. “You’ve never even tried this one before.”

“I don’t need to try it to know. I know the other one is the best,” Beth snipped back.

It is NOT. She doesn’t KNOW. This one is the richest and fudgiest. I modified the old Walker Museum Gallery 8 cookbook recipe for Wellesley Fudge Cake.

Wellesley Fudge Cake

Cake part:
½ c butter, softened
2 c minus 2 T sugar
4 egg yolks
1 c flour
1 c cocoa
4 t baking powder
½ t salt
1 c milk
2 t vanilla
4 egg whites

Frosting part:
12 oz chocolate chips
¾ c sour cream
1 t vanilla
1 pinch salt

First, do your mise en place for the cake:
  • Preheat the oven to 325°.
  • It is easiest to use an electric mixer for this recipe. Haul yours out.
  • Grease, line with parchment paper, and flour three 9-inch layer pans.
  • Separate your eggs. Be careful not to get any yolk in the whites. Put the yolks in a small bowl and the whites in a medium to large bowl.
  • Sift the flour, cocoa powder, and salt together into a bowl.
  • Put the milk and vanilla together in a measuring cup or some other vessel. I dunno, maybe a bowl.
Now you’re ready to roll.

In yet another large bowl, cream the butter and sugar until light and fluffy. Beat in the egg yolks.

Mix in ⅓ of the dry ingredients. Then stir in ½ the milk mixture, followed by more dry stuff, more milk, and the last of the dry stuff.

Wash the beaters; any trace of fat will prevent the next step from coming true. With clean beaters, beat the egg whites to the soft peak stage. (Fat prevents egg whites from whipping up. I don’t know why. It’s probably just hatefulness.)

Fold ⅓ of the egg whites into the batter, then the next ⅓, then the final part. This helps the egg whites stay fluffy and gives your cake batter the best shot at high volume.

Spread the batter into the three pans and bake 20 to 25 minutes, or until a cake tester comes out mostly clean. Cool in the pans on racks for 10 minutes, then invert and peel off the parchment. Cool some more.

While the cake bakes, make the frosting:

Melt the chocolate chips in a heavy-bottomed pan over low heat. Stir in the sour cream. Stir in the salt and vanilla.

Frost your cake with the warm frosting. The frosting will firm up as it cools, producing a cake that resembles a fudge-walled fortress.

Thursday, October 27, 2011

Cookin’ the Farmshare

My neighbor Gwen and I share a CSA box from Harmony Valley. We are the perfect CSA companions. Everything she loves best is stuff I can take or leave. Everything I covet is something she thinks is a hassle to prepare. We think it’s a fair split if the single head of romaine goes to her house and the lone celeriac goes to mine. It’s true harmony!

Last week Gwen was out of town, which meant I got to keep the entire share. Whenever this happens, I feel a mixture of glee and guilt.
On the one hand, having an entire box of vegetables to myself is like playing with the Lincoln Logs while my brother is at T-ball practice. You mean I don’t have to split the roof slats with you? I can have all the flat logs? I can build an entire cabin the way I want without sharing?!

On the other hand, I hate to see my friendly neighbor lose out on tasty snacks. So when I opened the box last week, my heart fluttered. Much of the delivery was storage veggies: squash, sweet potatoes, leeks, kale, and beets. They would easily live until Gwen got home. But then she wouldn’t want to cook them.

“Surely, though,” I thought, “she’d like to eat them.” And since I was going to cook for myself anyway…

Leek and Potato Soup (potage Parmentier)
I used the recipe from Joy of Cooking. This soup is supposed to be white, but I used some very roasted, very vegetably chicken stock I froze earlier. I’m pretty sure the stock was made out of Harmony Valley vegetable scraps and a chicken raised by my neighbor Andrea’s mom. That chicken was really good.

Raw Kale Salad with Roasted Baby Beets
Harmony Valley sent red kale and marble-sized golden beets. I used the recipe from Kim Christensen’s “A Year to Eat Freely” 2011 calendar. I wonder if it’s still available on her Affairs of Living blog? This is a favorite recipe to which I keep returning again and again.

I scrubbed the beets, tossed them with oil, tented them with foil, and cooked them on a baking sheet in a 350° oven for an hour. When they were cool enough, I peeled them and popped them onto the salad. The next day, it occurred to me to toss some toasted walnuts on that too.

Sweet Potatoes Roasted with Apples
This one is based on another recipe from Joy of Cooking; but because I altered the cooking method, I will claim it as mine.

2 T butter
6 medium sweet potatoes, scrubbed well and sliced
3 apples, cored and cut into chunks
½ c brown sugar
A splash of water
Salt and pepper to taste

Put the butter in a large roasting pan and melt it in a 400° oven.

Add the sweet potatoes, apples, and sugar. Toss them all together in the pan to coat them. Add a splash of water to the pan.

Cook in the oven, stirring occasionally, until the liquid has boiled down and a sticky syrup remains. This will take perhaps 40 minutes. Season with salt and pepper. Mmm, boy.

Tuesday, October 11, 2011

Have Fun Eating Your Sheep


“Bye, honey. Have fun eating your sheep,” said my sweetheart.

I ended the phone call, turned to Judy, and shrugged. Beth would not be joining us. We were in Judy’s kitchen putting the final touches on dinner. The meal featured breast of lamb, which Judy had found in limited supply at her butcher shop. We’d seasoned it the night before, and it was cooking on her grill. I took a cutting board off the counter and turned toward the back door.


“Why does only half of a couple like lamb?” Judy called after me. Beth doesn’t like it. Judy’s partner, Stu, doesn’t like it. My mother had called while we were cooking and, upon hearing the menu, reported that my stepdad doesn’t like it either.

I put the laden cutting board back on the countertop. “Beth won’t eat it because lambs are cute and fluffy,” I remarked.

“Well that just makes them taste even better,” Judy replied.


Maybe and maybe not. What REALLY makes them taste even better are a dry marinade and a slow fire.

Grilly Lamb
Breast of lamb or some other lamb part
1 lemon
Olive oil
One of these dry rubs:
Let’s Pretend We’re Greek
Mix or grind together:
Minced leaves from 8 sprigs of rosemary
3-4 cloves of garlic, minced
1 T fresh ground black pepper
Grated zest of 1 lemon
2 t sea salt
Let’s Pretend We’re Moroccan
Mix or grind together:
Minced leaves from 3 sprigs parsley
Minced leaves from 3 sprigs mint
1-2 cloves garlic, minced
1 t fresh ground black pepper
2 t sea salt
1 t ground coriander
½ t ground cumin
¼ t ground cinnamon
1 minced cayenne pepper
If you need lemon zest, then zest the lemon before you juice it.

Juice ½ the lemon, add an equal amount of olive oil, and whisk these together. Brush the lamb all over with the mixture.

Rub the dry rub all over the lamb.

Wrap the seasoned lamb tightly in plastic wrap and refrigerate overnight.

Grill over indirect heat as low as you can manage. Judy cooked at 325° for about 45 minutes.

Take the lamb off the grill and let rest 20 minutes before carving.

Oh. Mah. Gaw.

Thursday, September 29, 2011

Menus Stand Still


I had occasion to take a meal to someone, and I decided to see what it was like to be inside Mollie Katzen’s head. I got out her Still Life With Menu Cookbook and opened it to somewhere in the middle.

Menu #21 is a tribute to southwestern cooking: eggplant relish with roasted peppers and ground pepitas; lentil chili; corn and red pepper muffins. (And, randomly, chocolate chip peanut butter cookies for dessert.) The food sounded simple, comforting, unfussy. It would be easy to reheat, would hold up well as leftovers, and would do OK in the freezer. I could double the batches and feed myself, too.

The food did everything it was supposed to do: taste good, fill the belly, comfort and nourish. The startling part was my recognition of the meal as a snapshot of food trends past. I don’t mean this as a slam, but I can’t think of a nice way to phrase it: this food is out of date.

I realized that the cookbook and the menu were put together at a time when the flavors of America’s southwest were new and unusual. Chiles, especially, were novel. Katzen’s recipes specify bell peppers and crushed red pepper, especially for cooks who are not “lucky enough to have access to fresh chiles.” Now it is not unusual, or even worthy of comment, to find dozens of kinds of fresh, dried, or canned chiles in grocery stores all over the nation. One recipe introduces pepitas as an exotic ingredient. Now I can buy them in my local big-box grocery store.

It’s just so... brown
Thinking a little more, I considered how this meal still has a foot in the vegetarian cooking of the 1970s and 1980s—which defined food in a context of meat. Meat’s conspicuous absence was everywhere. Menus still had a main dish and supporting sides. Dinner items had a protein-rich substitute for meat, often intending to echo its taste or texture. Chefs defined their food not by what it was, but by what it wasn’t: recipes titled “meatless” and “dairy-free” abounded. These things do still happen, but vegetarianism has evolved. Vegetables do not need to play supporting roles to a bowl of something brown.

The fact that I can, in 2011, call a menu unremarkable is a tribute to Mollie Katzen and the Moosewood Collective. Katzen’s adaptable and conversational approach to food, coupled with the reach and appeal of her bestselling cookbooks, made vegetarian cooking accessible for cooks across the nation. The fact that southwestern flavors are not news simply means that everyone has tried them and liked them well enough to cook and eat them all the time. And just because they are commonplace doesn’t make them any less delicious.

Thursday, September 22, 2011

Kick Butt Biscuits

This summer, Katrina gave me these Ninjabread Men cookie cutters because she likes the Fallen Caesar cookies I make for the Ides of March.

Well, OK! The first opportunity I’ve had to use them is this week. I’m making biscuits to go with a chicken dinner. Maybe it will be even more fun if they are Kick Butt Biscuits.

So, here we go: rolling out the dough and cutting it into ninja shapes.

There is a lot of leftover dough scrappins, too. I balled that back up and rolled it out into squares because, hey, biscuits.

Oh, looks like the square biscuits are itching to join the melee. But no, square biscuits, those other biscuits are highly trained martial artists, you’ll just get your…

…butts kicked. I TOLD you.

Saturday, September 17, 2011

This Doesn't Suck


“WHAT?!” I squawked.

“I don’t like it,” Beth repeated.

“But you like corn, and you like cream, and I replaced the lima beans with edamame, and you like that,” I insisted.

“Yes. I like those things, but I hate the succotash taste.” She patted my cheek. “More for you.”

More for me indeed.

Amy’s Take on Tash
The prime elements of succotash are corn and beans. They’re in season now, at the juxtaposition of summer and fall. You can tart it up with other things, too. This serves 4-6 people as a light main dish or a generous side.

4 ears fresh corn (will render 4 cups kernels)
1 pound edamame (will render 2 cups of shelled beans)
1 large red bell pepper, seeded and diced
1 medium onion, diced
1 medium zucchini, quartered lengthwise and sliced
1 T butter
1 c heavy cream
1 t dried thyme or 1 T fresh thyme leaves
Salt and freshly ground black pepper to taste

Throw the edamame, in its shell, in a pot with a half inch of boiling water. Cover and steam them about 5 minutes, then drain and pop them out of their shells.

Cut the kernels off the cobs of corn. Use a sharp knife, stand the ear on end, and cut close to the cob, taking care not to cut into it. Cut off 2 or 3 rows at a time. Then turn the knife over and scrape the dull edge along the cob to extract the “cream.”

Melt the butter in a heavy-bottomed saucepan. Sauté the onion, pepper, and zucchini until the onion are translucent. Remove from the pot and set aside.

Pour the cream in the pot and boil gently until reduced by half. Throw all the other ingredients in there and bring them back up to a bubble. Turn the heat down, cover the pot, and simmer for 5 or 10 minutes—until the corn is cooked and the edamame are tender. Correct the seasoning and serve to acclaim!

Wednesday, September 7, 2011

Just sayin'

Caprese salad with three kinds of tomato, homegrown basil, and Valli dell’Etna “Etna Dario” olive oil; peppers, zucchini, and eggplant sautéed with garlic and onions.

Friday, September 2, 2011

Jam Is Good

Left to right, vanilla pear (made with pectin) from Food in Jars; black plum; and Michigan peach.

Thus say I:
  1. It is easy and fun to make jam;
  2. It is fun to eat jam;
  3. It is fun to say “jam.” Jam, jam, jam. Jam!
Therefore, I am going to make a boatload of jam this fall instead of/in addition to the too many pickles I usually make.
There are many schools of jam: hard-set jam, runny jam. Liquid pectin, powdered pectin, no pectin. Pounds of sugar; some sugar; no sugar. Sealed in a canner; sealed with paraffin. Cooked jam, freezer jam. I’ve been thinking a lot about all these jamways, their various pros and cons, and I have two working generalizations.

First, you can’t screw it up. If you make a good-faith effort and follow the steps, whatever you turn out will qualify as jam. It may be thin, it may be thick; but it will still fall in the jam gamut. The “jamut.” Snrrrrrk!

Second, all jam is good. Like all religions are good! There’s no right or wrong way to make jam, and there’s no right or wrong religion. They are all valid ways to worship fruit or deity, respectively. And there are many paths to thickness, too. Pectin will thicken jam, as will sugar and cooking down. Every one of them is good and right.

Except for my grandma’s recipe for zucchini jam made with cherry Jello. That’s where I draw the line. No, Grandma! That’s not jam. That’s an abomination of jam and Jello salad!

Basic Jam
Usually I am all for specifics, but jam is more a state of being for fruit. Seedy little fruits make jam that thickens nicely on its own. Fruits with little or no pectin will maybe need you to add some; or you may have to cook them down and they will acquire a hard-candy taste; or you can embrace softer jam. Ripe fruits have more flavor, but less pectin, than firm fruits.


Don't be scared! Let it boil hard.
I’ve gotten good results by measuring out ½ to ¾, even as much as 1, cup of sugar for every cup of chopped or crushed fruit; heat up the fruit to boiling; dump in the sugar and bring to a rolling boil; cook around 5 minutes, put in jars, and process in a hot water canner. You can also use wax, which you’ll find in the grocery store.


Directions very much like this are easy to find on many other Web sites and in books. For more reassurance on how jam becomes jam no matter what, see here.

Sunday, August 28, 2011

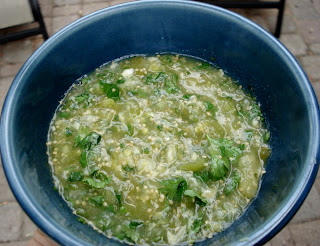
Green Salsa for Lazy People


I have a rule of thumb for salsa: a good recipe has five things in it. Why? Because then I can remember it by counting it off on my hand. I am too lazy to go through life looking up the recipe for something that I should know how to make off the top of my head.

Circular logic aside, I have a convergence of vegetables today: tomatillos, jalapeños, onion, cilantro, and garlic. See? Five things.

Tomatillos usually get cooked, so I will throw them in a pan with water. I will throw in the jalapeños, too. If I were feeling really lazy, I wouldn’t seed them first. I’m going to do it, though, because the people who will eat this with me don’t like too much heat. I may be lazy, but I’m not MEAN and lazy.

Meanwhile I chop up some onion and some cilantro and a clove or two of garlic. How much? Some. Who cares. I’d measure, but I’m too lazy. How fine to chop things? Meh. La-a-a-zy.

Here’s what makes it super lazy: all the things are just going in the blender. I will push a button and then it will be salsa. How much lazier can I get?!

Tomatillo Salsa
A handful of tomatillos, husks removed, rinsed
One or two jalapeño peppers, seeded or not
A clove or two of garlic, minced
A few tablespoons of onion or scallion, chopped
A handful of cilantro, chopped roughly

Put the tomatillos and jalapeños in a pan with water just to cover. Bring to a simmer and cook until the tomatillos turn a dull green and get heated through, about 5-10 minutes. Drain.

Meanwhile, wash and cut up the other three things.


Throw everything in a blender and pulse a few times until everything is roughly blended. You should have chunks and lumps and few worries.

If you need to add a little salt to taste, I won’t tell and I won’t count it as one of the five ingredients.

Sunday, August 14, 2011

Justify My Fennel


Mom called me a few weeks ago to chat. We got to complaining about our fennel. “Mine isn’t making any bulbs,” I said.

“Mine isn’t either,” she replied. Earlier this spring, we had split a six-pack of bronze fennel seedlings. We had checked the tag carefully to make sure it would make bulbs. We’d been assured it would. It hasn’t.

“Guess we got sold a bill of goods,” I grumped.

The fennel has been making really pretty leaves, though. It looks wispy and airy in the garden. I read in one of my garden magazines that fennel flowers are good for bees, butterflies, hoverflies, and other amusing pollinators. So when my ne’er-do-well vegetables started to bloom, I didn’t stand in their way.

I thought bronze fennel ought to earn its keep at least once this summer, so I snipped some leaves into a cucumber salad. Not only does the leaf look great against the pale green of the cucumber, but the flavor complements the sweet-sour of apple cider vinegar and a pinch of sugar in the dressing.

I, though, am not the one who has most been enjoying the fennel this summer. I went to the garden today to admire my fennel, and I found something that makes up for any disappointment I might have felt before. There was a big fat black swallowtail caterpillar munching down one of my plants.


Hooray! You keep at it, sweetie. When you finish that one, there are three more just like it.

Cucumber Salad
Better get some before Swallowtail finishes it all off...

4 cucumbers
1 small sweet onion
2 t salt
2 t sugar
¼ c apple cider vinegar
3 T olive oil
A few grinds of black pepper
2-3 T snipped fennel leaves

Slice the cucumbers and onions. Toss them with the salt and set aside for half an hour. Briefly rinse them, then drain well.

Meanwhile, whisk the rest of the ingredients together. Toss them with the cucumbers and onions. Done!

Monday, August 8, 2011

Black Diamond Watermelon


Look at this thing.

My mom bought me a Black Diamond watermelon from Untiedt's at the Minneapolis Farmers Market. It's practically black on the outside and screaming red on the inside. Scarlet red. Hester Prynne red.

I can't quite believe how sweet it is. In fact, I'm concerned that I forgot how sweet it is, so I might have to go eat another piece right now to make sure I remember right. About how sweet the watermelon is.

It's really sweet.

Sunday, July 31, 2011

Berry Tart


When I tell people what I did yesterday, they say, “You did WHAT now?” Together with two other women, I hosted a baby shower.

This is seemingly a thing about as far removed from my regularly scheduled life as is possible: my house filled with a dozen straight women dressed for a summer party, toting colorfully wrapped packages and ready to talk about babies and children.

Except that the pregnant lady we’re showering is Katrina. She and all her friends, as it turns out, have many things in common. We love books, for one thing (that shower probably had the highest percentage of MFAs at any gathering outside the Loft). We loathe baby shower games; none were planned and no one missed them except to express relief at their absence. And nobody was shy about enjoying a good lunch made of fresh summer produce, or about having a slice of berry tart for dessert.

Berry Tart with Lemon Cream
This dessert is no less delicious for its ease of preparation; you can have the whole thing done in an hour from start to finish. It serves twelve—one slice for every lady at the party plus one more for Katrina to eat later. You know, so the baby can have a piece too.

Half a box of graham crackers (14 sheets)
⅓ c sugar
½ t cinnamon
1 stick butter, melted
10 oz (1 ¼ packages) cream cheese at room temperature
1/3 c sugar
2-3 T fresh lemon juice
1/3 c heavy cream
2 pints assorted berries, washed/hulled/pitted/rendered fit to eat
¼ c jelly or preserves

Heat the oven to 350°. Smush up the graham crackers. I sealed mine in a Ziploc bag and steamrolled them with a rolling pin until they were fine crumbs. Stir in the sugar and cinnamon, then drizzle on the melted butter. Stir up well. Dump into a 10 or 11" tart pan with a removable bottom. Press crumbs into the sides of the pan first, then all over the bottom. Pop this into the oven to toast for 10 or 15 minutes, then cool completely.

Meanwhile, put the cream cheese, sugar, and lemon juice in a bowl and beat them together. Dump in the heavy cream and blend this until smooth.
While you are waiting for the crust to cool, get the berries ready. Wash them, do any hulling necessary, and dry them off. Finally, prepare the jelly or preserves. If you’re using preserves, put them through a strainer–you only want the goo, not the solids. This is going to be your glaze. Warm it up just enough to melt it.

Now it’s showtime. Spread the lemon cream evenly in the bottom of the cooled crust. Arrange the fruit artfully on top. Ideally, no cream would be showing through; but if you don’t have enough fruit to pull that off, don’t worry about it. Last, brush the jelly glaze over the fruit so everything is shiny.

Chill the tart at least four hours; you should probably eat it by the next day.

Sunday, July 24, 2011

Just sayin'


Cherry pie with sour cherries from Maple Leaf Orchard.

Sunday, July 10, 2011

Lemon Lavender Shortbread


I don't know what's wrong with me lately. I just can't get enough of lavender. I love the way it smells. I love the sight of it in my garden: the silvery leaves and happy purple flowers thrive in a hot, sunny spot where other plants might wilt. I can pretend that we, the lavender and I, are in Provence or Sicily under a baking and bright Mediterranean sun. Cheers, lavender!

Lately I even want to eat lavender. Every time I turn around, I'm finding a use for just a subtle hint of its scent and flavor. This week, those pretty flowers are in full bloom. If we bake them into shortbread, the palest of cookies, then we can still enjoy their color. Lemon zest adds more fragrance to the cookie; so do vanilla ice cream and fresh strawberries on the side.


Lemon Lavender Shortbread
10 T butter, softened
¼ c powdered sugar
1 ½ T granulated sugar
¼ t salt
1 ½ c flour
2 t lavender flowers; you may include some tiny, tender leaves
2 t lemon zest

Preheat oven to 300° F. Cream the powdered sugar, granulated sugar, and salt into the butter until light and fluffy. Sprinkle the flour, lemon zest, and lavender over the mixture and stir until well incorporated.
Pat the mixture into an 8 x 8 pan. Prick all over with a fork if you like. Bake until the shortbread is just thinking about turning golden brown; but take it out of the oven before it does anything much about that idea. This should take 45 to 50 minutes.

Cut the shortbread in the pan while it’s hot, then cool in the pan on a rack. Pop them out with a metal spatula. Serve to acclaim.

Sunday, June 26, 2011

Here's to Julie


A few months ago, we reshuffled desks at work. Julie from account services moved into the cube behind me. "I don't want a new neighbor," I grumbled. "She'll talk to me. She'll try to have conversations."

Well, I found that I like sitting by Julie. She has an ear out for stray remarks that might fly over the cubicle wall; she'll volley right back. It's fun.

Like the day two weeks ago when it went from 50 degrees to 103 degrees overnight and the air conditioning wasn't on. We were sitting in the cube farm, panting slightly and trying to concentrate on work. I was thinking about how nice it would be to go home and have something icy cold... something refreshing... something like...

"Lavender-infused vodka tonic on crushed ice," I announced to the air around me.

"Yes!" Julie exclaimed without missing a beat. "And we could have those here? Now?"

No. Just thinking about booze doesn't make it appear. (Plus we'd like to keep our jobs.) But I did try making my daydream a reality when I got home.

I have two Munstead lavender plants in my yard. They're from Dehn's Garden by way of the Minneapolis Farmers Market. I learned they are winter-hardy one year when we had a long, warm fall and I didn't get around to cleaning out the herb garden. The following spring, to my surprise and delight, the lavender was not dead. It put out new shoots. Who knew?!

"Who knows if this'll work," I thought to myself. I popped some sprigs in a jar, sloshed in some vodka, and left it alone for a few days.

It did work! The lavender imparts a lovely pale green color to the vodka, which pulls perfumey and minerally notes out of the herbs. This may edge out gin and tonic for my favorite summer drink.
I'll bring Julie some lavender sprigs on Monday. I just know she's going to like this.

Lavender-Infused Vodka Tonic

4-6 sprigs lavender
1 pint vodka
Ice
Tonic water

Wash the lavender and stuff it in a pint jar. Fill the jar with vodka and screw on the lid. Leave in a cool, dark place for 3 or 4 days (you can taste and see if the vodka is flavorful enough). Remove the sprigs and pour the vodka in a bottle if you have one.

Make yourself a nice drink with vodka, ice, and tonic!

Monday, June 20, 2011

Just sayin'


Grilled salmon; romaine salad with strawberries, lavender, rosemary, and balsamic vinaigrette; fresh bread with olive oil, sea salt, and cracked pepper.

Sunday, June 12, 2011

Kitchen's Done. Let's Drink!


My kitchen is done!

The last step was to put in the backsplash. I chose 2 x 6 subway tiles from Mission Tile West’s Revival series in blue wash. They make tiles to order, so I had to wait forEVER! for them to arrive. Almost none of them were broken and the guys from Handyman Connection were very careful and efficient. So now I have six or seven square feet of field tile left. What should I do with it? Someone hit me with ideas.

Detail: Look what a good job they did! Also: oooh, bullnose.


To celebrate, let’s make something easy and fun. The new countertops are acid-proof and the backsplash means I can use the blender with impunity. Let’s make fruity drinks!

I got a pineapple on sale and the mint in my garden is green and glorious. Plus there is a brand new bottle of rum in the cupboard just begging to be opened.

Yeah, baby.

Pineapple Agua Fresca Mojito
This is fun because a) it can be made out of any fruit you want, really; b) it probably doesn’t need any added sugar; c) you can skip the booze and it is still delicious.

A pineapple
Water
Sugar to taste (probably none!)
Mint leaves
Rum

Peel the pineapple. Don’t worry about doing too good of a job; and you don’t need to bother coring it, either. Cut it into chunks.

Fill the blender with pineapple chunks. Pour in some water; the waterline should be maybe a quarter to a third of the way up the blender jar. Liquefy. Set a fine strainer over a bowl and dump in the puree. Repeat this until there is no more pineapple. You may be forced to eat a chunk or two, you poor thing.

When the puree is well drained, sweeten the fruity water to taste (you might not need any sugar at all). Pour it into a pitcher and chill well. The pulp is done for, unless someone knows of a use for it besides compost?

Now then. Tear up a mint leaf or two or three into a tall glass. Use a chopstick or the handle of a wooden spoon to smash up the leaves a bit. Drop in some ice cubes and a finger or three of rum. Fill up with agua fresca, stir, and enjoy!

Tuesday, May 31, 2011

Mustard Jar Redemption


I’m really sorry I didn’t take the picture earlier. This is all that was left by the time I got back to the kitchen from grilling the brats. The other diners were merciless; they took no prisoners.

At least they didn’t take the last spoonful of potato salad, too. Even if they had, I would be too busy being proud of my recipe to get upset. I like this one for two reasons:

  1. It is fresh, simple, and immediate. There are only a handful of ingredients, but the vegetables can be locally grown and soon they’ll all be in season together.
  2. The dressing is a great way to finish off a jar of mustard.
No, really. You know when there is only a little bit of mustard at the bottom of the jar or bottle? You can go in there with a knife and scrape all day. The jar will ring like a bell but you will not get enough mustard to season a sandwich. You can shake the bottle for twenty minutes but all you can get out of it are rude noises. But since there’s still a bunch of mustard stuck to the sides of the container, you stick it back in the fridge. “Stupid mustard,” you think to yourself. “I wish I had the cunning to use you up or the courage to throw you out.”

Well this salad dressing will take care of it for you! There’s probably just the right amount of mustard left in the jar. Take off the lid, put in the rest of the dressing ingredients, and shake. You will get a delicious salad dressing. You will clean up the container so it is fit to go in with the recycling. And you will have used up the last of that mustard. Aaah, closure!

Potato Salad with Dijon Dressing
Serves 6 to 8.

1 ½ lb potatoes (new red potatoes are great), scrubbed and cut in chunks
½ lb asparagus or green beans, snapped into 1” pieces
2 T Dijon mustard
2 T red wine vinegar
2 T lemon juice
1/3 c olive oil
3 T dill leaves, coarsely chopped
1 T capers

Boil the potatoes until just tender, about 20-25 minutes. In the last few minutes of cooking, throw the asparagus or green beans into the pot.
Drain the vegetables and plunge them into ice water to stop the cooking. Drain well. Chill.

Shake the mustard, vinegar, lemon juice, and oil until combined.

Close to serving time, toss the vegetables with the dill, the capers, and the dressing. If you leave the salad sitting in its dressing, the potatoes will absorb much of the liquid. Who knows; maybe you like that sort of thing.

Sunday, May 22, 2011

Nettles called...

Oh, hi! Hey, nettles called. They asked me to tell you to stop talking about that part of your yard where “nothing grows.”

No way, you say. Nettles are something, all right. Look how mean they are! They are covered with these little stickers full of formic acid, the same stuff in ant bites and bee stings. You think you can be friends with nettles, but if you get close, they burn you every time. Amirite?

OK, you have a point. But if you just handle them right, nettles are cool. They can hang out in all kinds of snacks, like pasta and soup and frittata and stuff. Sometimes when you meet a vegetable and you can’t seem to get along, you should just do what you like to do until you get to know each other better, K?

Like, if you have 15 minutes, some cheese, and a couple of tortillas, maybe you guys could make quesadillas together. Then you’ll be just chillin’ with a beer, you and your new friend Nettles.

Nettle Quesadillas
1 bunch nettles (mine came from Harmony Valley)
1 cup shredded cheese
8 corn tortillas
2 T oil
Salt to taste
A dollop of salsa if you want

Wear gloves to pick the nettle leaves off the stems. Wash them well and spin them dry. There should be about 2 tightly packed cups of leaves.
Heat a tablespoon of oil in a heavy frying pan. Toss the nettles in the hot oil until they reduce in volume and cook through; you may need to throw a splash of water in the pan to keep things from sticking. Remove the cooked nettles to a plate or bowl and season to taste.

Wipe out the frying pan, add just enough oil to coat the bottom, and reheat. Lay a pair of corn tortillas in the pan. When they begin to puff up, flip them over. They should have toasty brown spots on them. Put about a quarter cup of cheese and a quarter of the nettles on one of the tortillas. Stack the other tortilla, toasted side down, on top.

When the cheese gets melty, flip the quesadilla over and cook until the last tortilla surface is toasty. Turn it out onto a plate, quarter it, and top with salsa maybe. Hand it immediately to someone to eat. Cook the remaining quesadillas in the same way.

Peace out!